Minipol User Guide
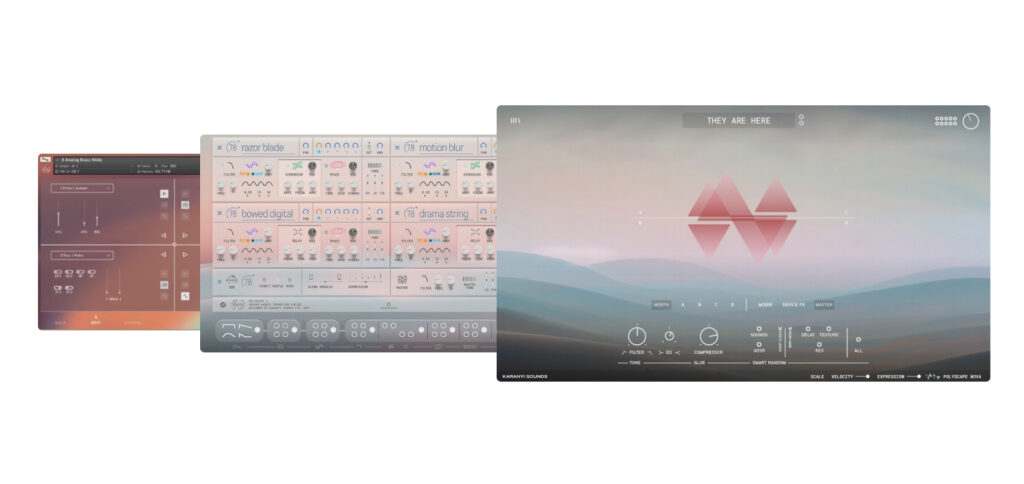
August 17, 2022First of all, thank you for purchasing Minipol! Minipol is a compact but versatile VST plugin and standalone virtual analog synth for Mac and Windows with smart random controls to provide controlled creativity to your sound design. The main page of the synth is split into four sections – the oscillators on the left, filters, envelopes, and LFOs in the middle, effects on the right, and the smart random controls across the bottom. The intelligent random controls section is where you can get quite creative with Minipol and stumble across some great and exciting sounds in a compact, easy-to-use package.
SYSTEM REQUIREMENTS
| macOS | Windows |
| – Intel CPU only (at least 2 GHz recommended) – macOS 10.11 or later – A VST3/AU compatible 64-bit host for the plugin version – 4GB RAM (more recommended) – 120MB free disk space | – x64-compatible CPU – Windows 7 SP1 or later – A VST3 compatible 64-bit host for the plugin version – 4GB RAM (more recommended) – 120MB free disk space |
SETUP
Downloading & Getting Your Serial Number
After you successfully purchase Minipol, you will receive an email with your download link and a unique serial number for your product. If you use a trial version, you can purchase a serial number here. To download your installer and get your activation number, please do the following:
- Log in to your Karanyi Sounds account and go to My Account’s Downloads page.
- On your Downloads page search for Minipol and you will find your unique serial code. You will need this serial number to activate your product during installation.
- Download your version of Minipol (Mac or Windows)
Installation (Mac)
- After downloading the .zip file, extract it to a folder on your desktop.
- Run the Minipol installer program by double-clicking on “Minipol Installer 1.0.0.pkg“
- The program will install VST3, Audio Unit, and standalone versions on your computer.
Installation (Windows)
- After downloading the .zip file, extract it to a folder on your desktop.
- Run the Minipol installer program by double-clicking on “Minipol Installer 1.0.0.exe“
- The program will install VST3 and standalone versions on your computer.
Installing Samples & Activate Minipol
Minipol is a virtual analog synth but it comes with an additional sampled audio folder for the reverbs and the sub synth layers. You will need to install these components too after the minipol app has been successfully installed. To do this on first running Minipol, you will be prompted to install the sample package that came with the download:
- Select the top option to “Install Samples”
- Browse to your download folder that contains “Minipol_1_0_0_Samples.hr1” and select it
- Select where you would like to install the instrument samples. We recommend the same folder that you installed the standalone application or your Documents folder – either way, it must be on your internal hard drive.
- All other settings you can leave as they are. Click OK to install the sample pack, and then once completed, close the instrument.
- Re-open the instrument and enter your serial number provided. YOu can find this serial code in your mail (sent by [email protected]) or under your account’s My Downloads page.
- The instrument will start, and you’ll see the main screen, with the oscillator section to the left, filters and LFOs in the centre, and effects rack on the right.
Mac Uninstall (via Terminal app)
- Open Applications / Utilities / Terminal.app
- Copy and paste the following command and hit enter: sudo bash /Library/Minipol/1.0.0/uninstall.sh
- Terminal will ask for your computer password. Type it in and hit enter
- Terminal will ask you if you wish to continue [Y/n]? Press “Y” and hit enter. You are successfully removed minipol from your Mac.
Mac Uninstall (Manual)
If you wish to uninstall minipol, move the following files to your Trash:
- Macintosh HD / Library / Audio / Plug-Ins / VST3 / Minipol.vst3
- Macintosh HD / Library / Audio / Plug-Ins / Components / Minipol.component
- Macintosh HD / Applications / Minipol
- Macintosh HD / Users / [Your Username] / Library / Application Support / Karanyi Sounds / Minipol.
You have now successfully removed minipol from your Mac.
Windows Uninstall (via uninstaller)
Go to your chosen installation folder and run the file ‘unins000.exe’ and follow the instructions on the screen.
Windows Uninstall (Manual)
Uninstalling via ‘unins000.exe’ is recommended for Windows users, but if you wish to manually remove the files, delete the following folders:
- C: / Program Files / Karanyi Sounds / Minipol
- C: / Users / [yourname] / AppData / Roaming / Karanyi Sounds / Minipol
Finally navigate to the following folder and delete the file “Minipol x64.vst”
- C: / Program Files / Common Files / VST3 / Karanyi Sounds
Note – these are the default locations used at installation. If you altered the install locations when first installing Minipol then you need to navigate to those folders and delete the relevant files.
BRIEF OVERVIEW
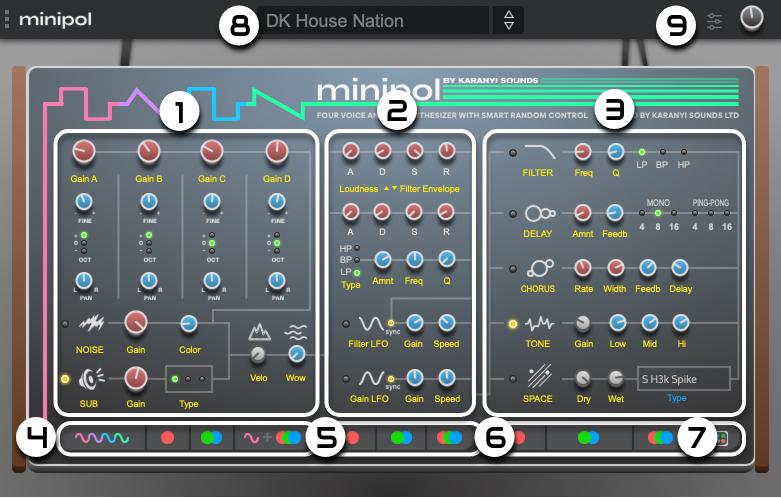
The UI is arranged in a straightforward signal flow, shown by the white lines linking up the different sections of the synth. So, for example, the filter LFO is placed after the filter envelopes, and the ‘Space’ reverb effect is placed at the end of the chain, after the other effects above it in the effects rack.
1) TONE SECTION: 4 Main Oscillators, 2 Additional Oscillators (Noise and Sub), Velocity sensitivity and Wow Control
2) SHAPE & MOVEMENT SECTION: Gain and Filter ADSRs, Filter and Gain LFOs
3) EFFECTS SECTION: Multimode Filter, Delay, Chorus, EQ and Reverb
4) TONE RANDOMIZERS: Randomize by parameter groups (color-coded) or all parameters within Tones section (Except Velocity)
5) SHAPE & MOVEMENT RANDOMIZERS: Randomize by parameter groups (color-coded) or all parameters within the SHAPE & MOVEMENT section
6) EFFECTS RANDOMIZER: Randomize by parameter groups (color-coded) or all parameters within the EFFECTS section (Except Gains)
7) FULL RANDOMIZER: Randomize all parameters (Except Velocity & Effect Gains)
8) PRESET NAME / OPEN PRESET WINDOW
9) SETTINGS: Midi Channel, Audio Setup & Pitch bend sensitivity
The controls in the UI are mostly knobs ranging from 0-100 in value (with the exception of the ‘pan’ controls that range from left to right), switches that are denoted by a row of green clickable lights, and a waveform selector at the top of each of the oscillator columns. There is also a dropdown menu in the ‘Space’ reverb effect with a list of sampled room tones.
The colouring of the controls is important in Minipol. All controls that are coloured red, blue, or green (in the case of switches) can be randomized by the Smart Random Controls strip across the bottom of the instrument. The grey controls, such as velocity or reverb dry/wet, are not randomized by the Smart Random Controls strip and need to be changed manually, as is the same with the yellow buttons to activate sections of the synth such as sub-bass or effects. More information about the randomizer controls can be found in a later section of this manual.
TONE SECTION
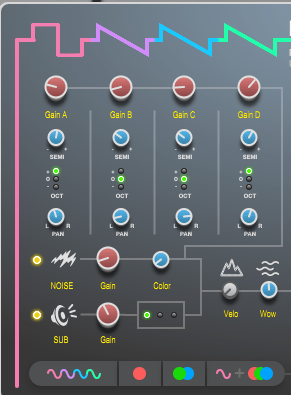
The left section contains four oscillators, which can be individually controlled in each column. All the controls for each oscillator are placed vertically. Choose from the four types of waveforms on each oscillator and adjust the volume, semitone, octave transposition, pan for each individually.
Waveforms

The graphics at the top of each column denote the waveform and can be switched by clicking and dragging on the picture up and down. Select from Sine, Triangle, Saw or Square shapes.
Gains

The red knobs at the top control the gain of each oscillator and can be used together to mix the sound, or turned all the way left to mute that oscillator entirely.
Transpose: Semitones

The blue knobs underneath control the fine tuning of each oscillator, up to 50ct either direction.
Transpose: Octaves

The green switches underneath are octave controls that can be switched one octave up, down, or set to normal.
Panning

Each oscillator has its own pan control that can be set to left and right.
Additional Oscillator: Noise
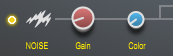
Underneath this, there are options to add a noise layer and a sub-layer. Both include gain controls to mix it into the sound, and the noise control has a ‘color’ control that can control the frequency of the noise coming into the sound.
Quick Tip: Try adding a small amount of noise at a high-mid frequency to flesh out bassy tones.
Additional Oscillator: Sub

The Sub is a sample-based sub layer with 3 flavors. All these three sublayers have been sampled from a hardware Oberheim OB-6 and they generate a pure low saw sound to add real analog depth to your sounds. There are 3 different samples to choose from, which can be selected by the green checkbox. The Sub-types are the following:
- Direct Sub (mono saw layer)
- Subtle Sub (35% detuned-unison stereo saw layer with 40% pan-spread)
- Fat Sub (50% detuned-unison stereo saw layer with 100% pan-spread)

At the end of this section are two controls. The grey knob correlates to how much velocity response is added to the sound, ranging from 0 (flat sound / no velocity control) to 100 (dynamic sound / complete sensitive velocity control). Finally, the ‘Wow’ control applies a subtle “tape-wowing” effect by modulation the overall pitch of minipol with an LFO to the oscillators as they pass through.
Quick Tip: Create nice vintage phasing of flanger effects by setting all the four Oscillators’ settings to the same values except the semitones and panning.
SHAPE & MOVEMENT SECTION
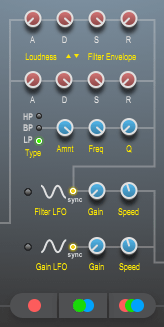
The central section of the synth contains several ways to shape your sound; a loudness envelope, a filter with envelope controls, and two LFOs that can control the gain of the filter, respectively.
Loudness & Filter Envelopes
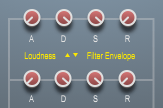
At the top there are two ADSR envelopes, the first of which controls loudness/volume, and the second of which controls the filter below.
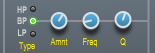
The filter section in the middle can be switched between Moog-style ladder 4 pole filters: HP (high-pass), BP (band-pass), or LP (low-pass). The frequency range of these filters is going from 60 Hz to 20 kHz. The ‘Amnt’ knob controls the amount that the filter envelope affects the filter; the ‘Freq’ knob controls the frequency that the selected filter affects, and the ‘Q’ knob controls the size of the filter curve.
Quick Tip: Because of the nature of probability, randomizing the envelopes tends to skew towards long attack and release pad type sounds, so to find exciting sounds with short attacks. We recommend randomizing everything else first and then manually editing the amplitude envelope straight away and seeing what the current patch sounds like as keys or plucks.
Low Frequency Oscillators: Filter LFO & Gain LFO
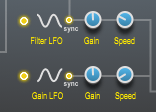
Underneath that section are two LFOs, the first affecting the filter and the second affecting the amplitude. These LFOs can be turned ON or OFF with the yellow button to the left of each, and the ‘Sync’ button changes the speed controls to either set in milliseconds or in the BPM of the synth (assessed by either the DAW host or in the Settings menu).
EFFECTS SECTION
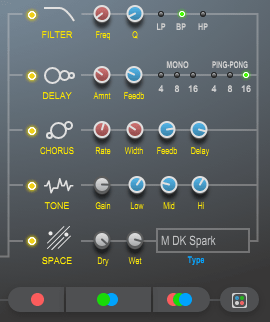
The right side of the synth has several effects options that can be turned on and off with the yellow buttons. They are routed from top to bottom and are as follows:
Master Filter

A second Master Filter to shape the sound further, with the same controls as the one in the middle section. The filter section in the middle can be switched between Moog-style ladder 4 pole filters: HP (high-pass), BP (band-pass), or LP (low-pass). The frequency range of these filters is going from 60 Hz to 20 kHz. The ‘Amnt’ knob controls the amount that the filter envelope affects the filter; the ‘Freq’ knob controls the frequency that the selected filter affects, and the ‘Q’ knob controls the size of the filter curve. Keep in mind that in some cases the filter can completely mute the sound of the synth if – for example – the Shape & Movement Section’s Filter is set to HP and you set the Master Filter to LP or vice versa.
Delay
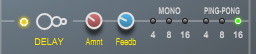
Two options of mono delay or ping pong (bouncing from left to right) delay, which is synced to the BPM of either the DAW host or the Settings page. The ‘amount’ knob controls the wet/dry mix of the delay signal, and the ‘feedb’ knob controls the amount of delay feedback.
| Preset Name | L Delay | R Delay | L Feedback 0% | L Feedback 100% | R Feedback 0% | R Feedback 100% |
| Mono 4 | 1/4 | 1/4 | 0% | 0% | 0% | 0% |
| Mono 8 | 1/8 | 1/8 | 0% | 0% | 0% | 0% |
| Mono 16 | 1/16 | 1/16 | 0% | 0% | 0% | 0% |
| Stereo 4 | 1/2 | 1/4 | 0% | 15% | 35% | 50% |
| Stereo 8 | 1/4 | 1/8 | 0% | 15% | 50% | 65% |
| Stereo 16 | 1/8 | 1/16 | 0% | 15% | 70% | 85% |
Chorus

A versatile chorus effect which can be used for 3 type of sound effects:
- Phaser
- Flanger
- Classic Chorus
The ‘rate’ knob controls the speed of the chorus; the ‘width’ knob controls the distance between the signals, the ‘Feedb’ knob controls the feedback of the chorus, and the ‘delay’ knob controls the delay before the chorus begins.
Quick Tip: Play with extremes of the Chorus effect to provide strange phaser sounds and almost FM sounding effects.
Tone

EQ control for the overall sound of the instrument, with
- Low (60 Hz, bell-curve eq for boost or attenuation)
- Mid (2 kHz, bell-curve eq for boost or attenuation) and
- High (8 kHz, high-shelf eq for boost or attenuation)
- Gain (-20dB to +20dB)
controls as well as a useful Gain control to lower any harsh distortion that some combinations of controls may produce.
Quick Tip: in some cases, minipol could produce very quiet or very loud sounds – especially if multiple effects are applied along with LP Filters set to low frequencies. In these cases, Tone’s Gain can be used for an extra gain to increase/decrease the overall volume of minipol.
Space

The Space section is a custom reverb library with an extensive selection of high-quality sampled room profiles, halls, unusual space, and special effects. We carefully sampled and created 60 patches from iconic reverb hardware’s such as:
- Lexicon 480L (marked as 480)
- Lexicon PCM70 (marked as P70)
- Lexicon PCM90 (marked as P90)
- Lexicon 300 (marked as L300)
- Bricasti Design M7 (marked as M7)
- Eventide H3000 (marked as H3k)
- TC Electronic Reverb 6000 (marked as TC6)
- Quasimidi Quasar (marked as QRS)
- Custom reverbs (marked as DK) with the combination of various Eventide H6 software effects and Strymon pedals
These are sorted into L(arge), M(edium, and S(small). Spaces can do subtle to dramatic changes to your sound: even with a simple hall reverb, you can really change the overall sound of your patch. The two knobs control the dry and wet signals, respectively.
Quick Tip: Space presets can really transform your sound to a completely different style – especially if you are creating cinematic, super soft, or heavy/fat sounds. It’s always a good idea to check the same patch with different Space presets – it can inspire you to use your sounds in a completely new way.
SMART-RANDOM BAR

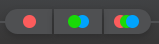
The heart of minipol is the Smart-Random Bar. This is not just another probability control for saving you time, but a very precise tool to edit patches fast and keep them fresh. Across the bottom of the instrument are these coloured buttons lined up with each section. This is Minipol’s smart random control section, and it allows you to experiment to open up a lot of creative possibilities in a short amount of time. They are basically all “randomize” buttons but linked to specific colour-coded controls.
Quick Tip: Smart Random Bar is the key feature of minipol and it can change the way you create new sounds! We have carefully set the randomizer parameters for each controls so if you just press the randomizer buttons it will give you always something fresh but still musical sound. For a start, we recommend using only the randomizer buttons when creating patches and than adjust the synth if needed.
Full Random

The square on the far right is simply a ‘randomise all’ button, which can create an entirely new sound.
Randomize / Section or by Control Type
All of the other buttons are colour-coded to randomize the relevant controls in those sections; for example, the red circle buttons only randomize the red knobs, which in the case of the left section is the gain controls for each oscillator, or in the middle the envelope controls. Likewise, the blue buttons randomize the blue knobs in their relevant sections; the green ones control the green switches. The waveform buttons on the left randomize what waveform shapes each oscillator uses.
The grey knobs and the yellow buttons in the synth are not affected by the random controls. Therefore you need to manually alter these settings for changing the velocity curve or turning on and off certain effects in the chain.
Using different combinations of these randomization options can open up a whole load of sound design possibilities and odd combinations out of the synth and allows you to keep the parts you think work well and be creative and random with parts you think could be altered.
By clicking on the preset name at the top of the screen, you can open the preset window, which is split into 3 columns. The first two are category subfolders, which you can add, rename and delete by using the buttons along the bottom. The column on the right is the list of presets within the selected folders, and once you have a sound you are happy with, you can click ‘Add’ on the right-hand column to add it to the selected folder.
Random Control Buttons Reference
| Random Control Button | Section | Randomized Controls |
 | TONE | OSC 1 Waveform OSC 2 Waveform OSC 3 Waveform OSC 4 Waveform |
 | TONE | OSC 1 Gain OSC 2 Gain OSC 3 Gain OSC 4 Gain OSC 5 (Noise) Gain Sub synth Sampler Gain |
 | TONE | OSC 1 Semitones OSC 2 Semitones OSC 3 Semitones OSC 4 Semitones OSC 5 (Noise) Color Sub synth Sampler Tone (1 or 2 or 3) |
 | TONE (ALL) | OSC 1 Waveform OSC 2 Waveform OSC 3 Waveform OSC 4 Waveform OSC 1 Gain OSC 2 Gain OSC 3 Gain OSC 4 Gain OSC 5 (Noise) Gain Sub synth Sampler Gain OSC 1 Semitones OSC 2 Semitones OSC 3 Semitones OSC 4 Semitones OSC 5 (Noise) Color Sub synth Sampler Tone (1 or 2 or 3) |
| SHAPE & MOVEMENT | Loudness Envelope Attack Loudness Envelope Decay Loudness Envelope Sustain Loudness Envelope Release Filter Envelope Attack Filter Envelope Decay Filter Envelope Sustain Filter Envelope Release |
| SHAPE & MOVEMENT | Filter Envelope Filter Type Filter Envelope Frequency Filter Envelope Q Filter LFO Gain Filter LFO Speed Gain LFO Gain Gain LFO Speed |
 | SHAPE & MOVEMENT (ALL) | Loudness Envelope Attack Loudness Envelope Decay Loudness Envelope Sustain Loudness Envelope Release Filter Envelope Attack Filter Envelope Decay Filter Envelope Sustain Filter Envelope Release Filter Envelope Filter Type Filter Envelope Frequency Filter Envelope Q Filter LFO Gain Filter LFO Speed Gain LFO Gain Gain LFO Speed |
| EFFECTS | Filter Frequency Delay Amount Chorus Width |
| EFFECTS | Filter Q Filter Type (LP, BP, HP) Delay Feedback Delay Presets (Mono 4, 8, 16, Stereo 4, 8, 16) Chorus Feedback Chorus Rate Chorus Delay Space Preset (Random Convolution reverb) |
| EFFECTS (ALL) | Filter Frequency Delay Amount Chorus Width Filter Q Filter Type (LP, BP, HP) Delay Feedback Delay Presets (Mono 4, 8, 16, Stereo 4, 8, 16) Chorus Feedback Chorus Rate Chorus Delay Space Preset (Random Convolution reverb) |
 | RANDOMIZE ALL SECTIONS | OSC Waveform Random Randomize at once: OSC 1 Waveform OSC 2 Waveform OSC 3 Waveform OSC 4 Waveform OSC Gain Random Randomize at once: OSC 1 Gain OSC 2 Gain OSC 3 Gain OSC 4 Gain OSC 5 (Noise) Gain Sub synth Sampler Gain Randomize at once: OSC 1 Semitones OSC 2 Semitones OSC 3 Semitones OSC 4 Semitones OSC 5 (Noise) Color Sub synth Sampler Tone (1 or 2 or 3) Loudness Envelope Attack Loudness Envelope Decay Loudness Envelope Sustain Loudness Envelope Release Filter Envelope Attack Filter Envelope Decay Filter Envelope Sustain Filter Envelope Release Filter Envelope Filter Type Filter Envelope Frequency Filter Envelope Q Filter LFO Gain Filter LFO Speed Gain LFO Gain Gain LFO Speed Filter Frequency Delay Amount Chorus Width Filter Q Filter Type (LP, BP, HP) Delay Feedback Delay Presets (Mono 4, 8, 16, Stereo 4, 8, 16) Chorus Feedback Chorus Rate Chorus Delay Space Preset (Random Convolution reverb) |
PRESET WINDOW
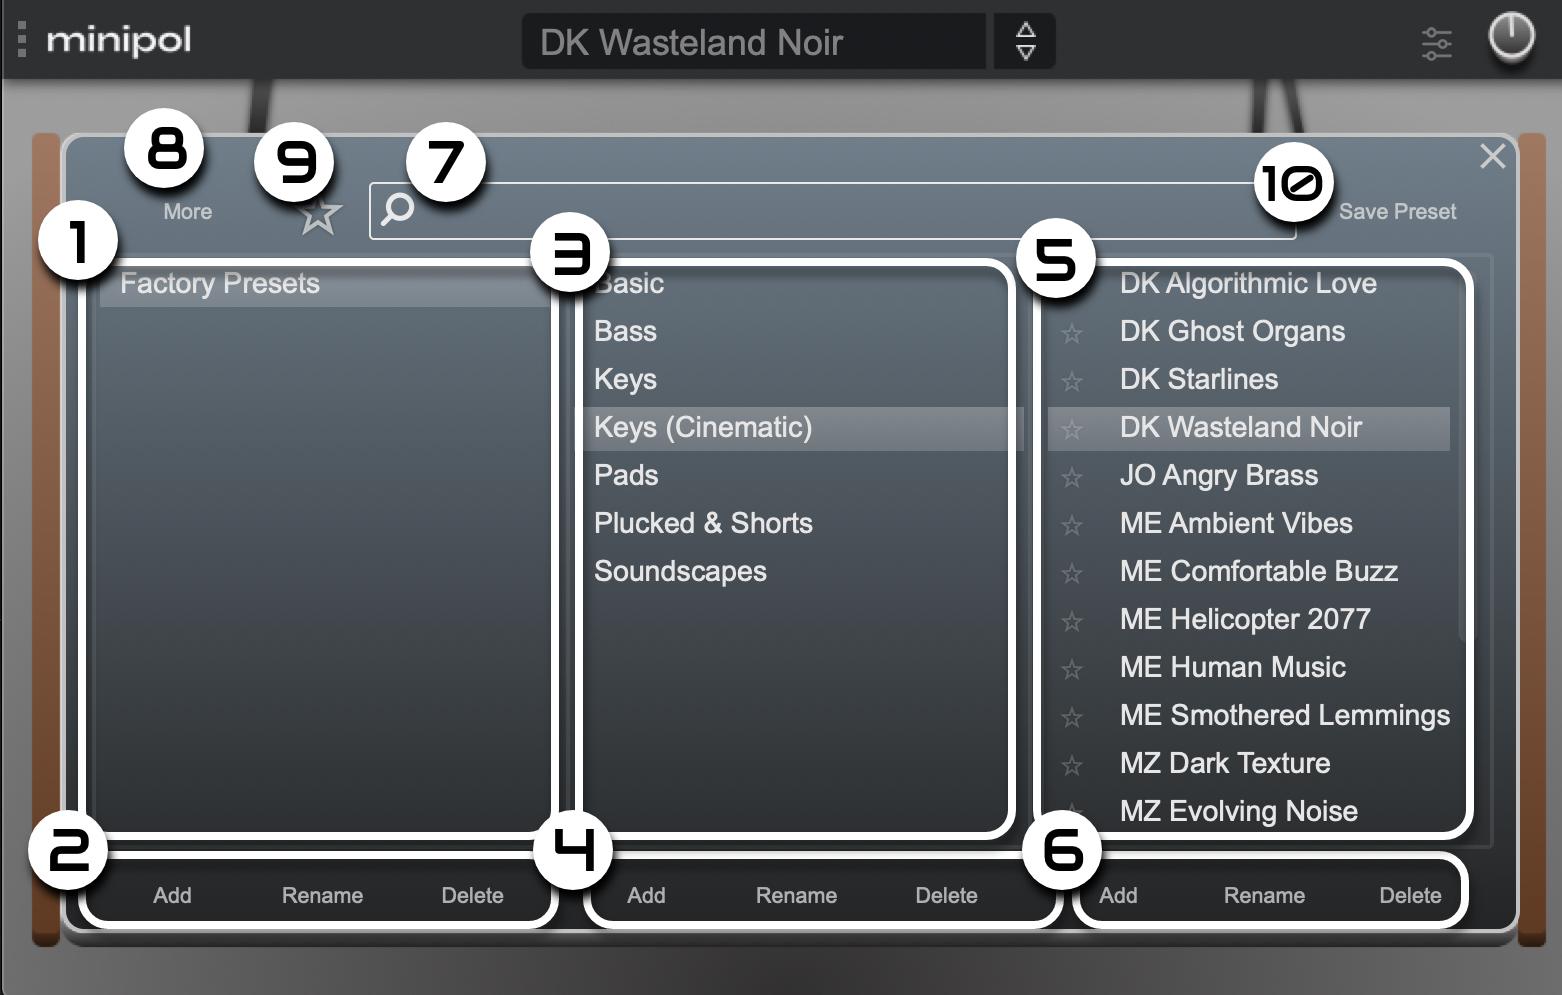
List of Functions
Here you can save / delete / edit and organize your minipol presets and libraries.
1) PRESET LIBRARY: By default you can see the Factory Presets Library only
2) PRESET LIBRARY EDITOR: Add, Rename or delete the selected Libraries
3) PRESET CATEGORIES: The list of categories within the selected Preset Library
4) PRESET CATEGORY EDITOR: Add, Rename or delete the selected Categories
5) PRESETS: The list of presets within the selected Category
6) PRESET EDITOR: Add, Rename or delete the selected Presets. When saving a new preset use the “Add” button here instead the “Save Preset” button above.
7) PRESET SEARCH: Search for a preset by entering a keyword and hit enter
8) IMPORT / EXPORT PRESETS: You can save all your presets at once and export them or import new minipol Sound Sets here.
9) FAVOURITES: You can access to your Favourites Panel presets here. To exit from Favourites Panel just click on the star icon again.
10) OVERWRITE PRESET: Use this button only if you want to save the currently edited preset
The Factory Presets Library
Minipol comes with 300 Factory Presets created by several artists from around the globe. These presets are categorised into 10 types:
- Basic (Initial patches and basic sounds. If you want to create a patch from scratch, start here)
- Bass (Classic bass sounds, presets for house, techno, synthwave, and other electronic music genres)
- Keys (Vintage and modern synthesizer keys)
- Cinematic Keys (Abstract, lush or sound-designed keys for scoring)
- Pads (Classic and modern synthesizer pads)
- Plucked & Shorts (Presets for fast sequences, arps, or plucked sounds)
- Soundscapes (Slow, evolving sounds or atonal experimental pads)
Load a Preset via the Preset Browser
- Select a Preset Library (by default this is ‘Factory Presets’, but you can create your custom preset libraries too)
- Select an Instrument Category
- Select a Preset by clicking on its name – it will instantly load in
- Click on the X in the right upper corner to close the preset browser
Load a Preset on the Main Panel
To load a preset, you can click on it in the preset window or use the arrows at the top of the instrument to cycle through all the presets in the selected folder.
Save a New Preset
- Click on the current preset name on the top of the instrument. This will open the Preset Window.
- Navigate to the Preset Library / Instrument Category where you want to save your new preset.
- Click the ‘Add’ button at the bottom of the Preset column.
- Name your preset in the pop-up and hit ‘Save’
Overwrite Current Preset
- Click on the current preset name on the top of the instrument. This will open the Preset Window.
- By clicking the ‘Save Preset’ button at the top of the window will overwrite your currently edited preset
Search for a Preset in Preset Window
- Click on the current preset name on the top of the instrument. This will open the Preset Window.
- Type your keyword into the search bar in the top of the Preset Window and hit Enter
- Select the preset you wish to use from the list of results and hit ‘X’ in the right corner of this window to exit to the Editor Panel OR
- Delete the keyword you entered and hit enter to exit to Preset Window
Add or Browse your Favourite Presets
- Click on the current preset name on the top of the instrument. This will open the Preset Window.
- Click the small star next to the preset name in the preset window.
- You can show a list of all your favorite sounds by clicking the large star next to the search bar in the preset window.
Quick Tip: All your settings – including MIDI CC, Pitch Range adjustments – are saved along with your presets. Feel free to assign any parameters to any controls on your midi controller or in your DAW to create advanced automations for your tracks.
SETTINGS WINDOW
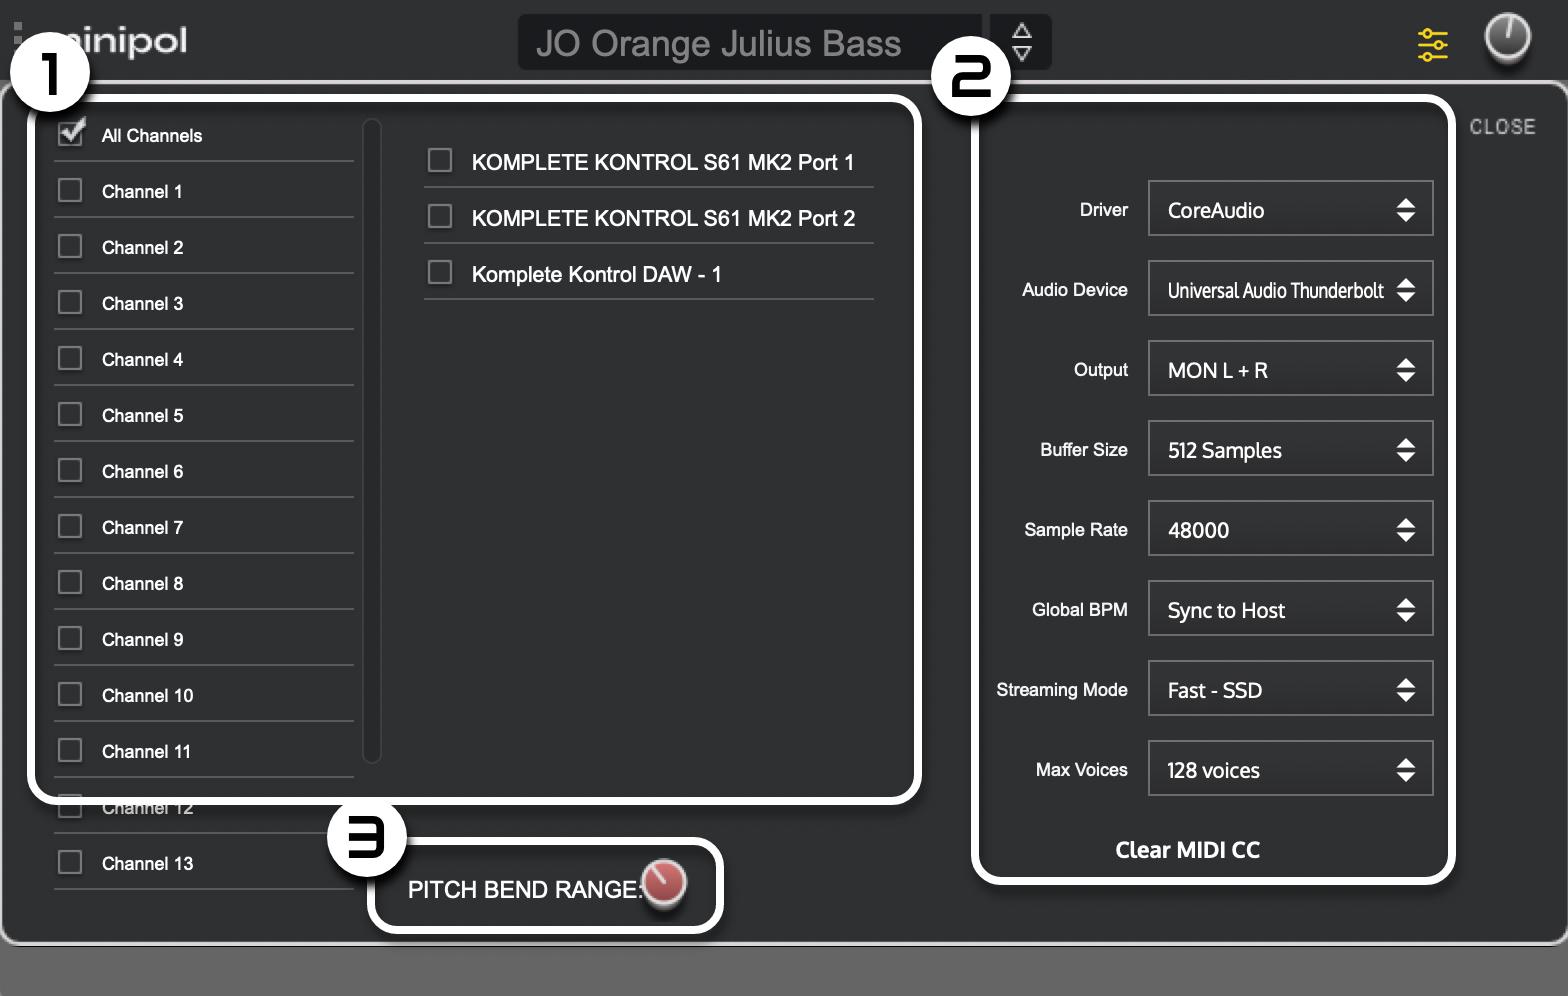
By clicking the Settings button to the left of the master volume control, you can access several settings in the Minipol synth.
List of Functions
Here you can setup your midi controller and soundcard with minipol
1) MIDI CONTROLLER & CHANNEL SETUP: Select the midi channel and in-out device you want to use with minipol
2) AUDIO SETUP: Your soundcard settings in minipol. These options are available only in the Standalone version.
3) PITCH BEND RANGE: Set the pitch band range of your midi controller. Please note: this option is saved along with your preset.
Midi Controller Setup

Across the left is which channels of the host software or selected audio device Minipol will output from.
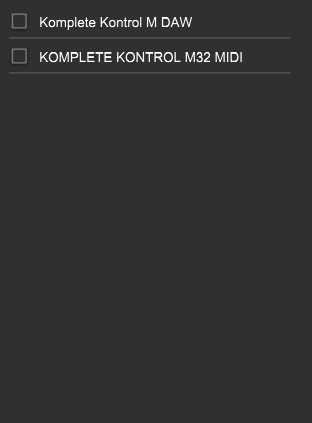
In the centre is a selection of available MIDI devices and controllers that can be used to control the synth.
Pitch Range

The red knob controls the pitch bend range (0-12 whole notes) of the current patch. This is linked to each patch, so changing presets will change the value of this knob. Please note that Minipol’s software instrument pitch (the global tuning of the software instrument) is fixed to the concert pitch A (440 Hz).
Soundcard Setup
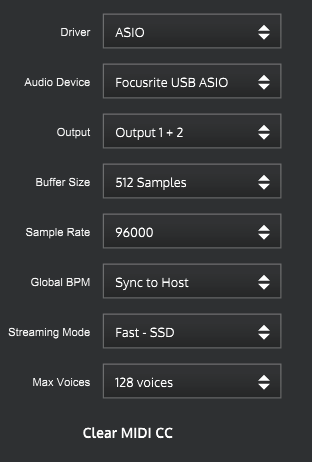
This menu has options for the functioning of Minipol. In the standalone version, all of these options will be available, but in the plugin version, the host DAW will dictate most of these options, and they will be greyed out. There is a ‘Clear MIDI CC’ button at the bottom to clear any parameters that have been assigned to MIDI CC controls.
MIDI ASSIGNMENT
Each control in Minipol can be assigned to a MIDI continuous controller (CC), which can then be manipulated via your MIDI controller of choice, selected either by your host DAW or from within the Settings menu of the instrument.

Right-click on the control you want to assign, and either click MIDI Learn and move the desired hardware controller, or manually assign it through the ‘Assign MIDI CC’ menu.
DAW AUTOMATION
Many controls within Minipol have been assigned to automation lanes to be used within your DAW of choice. A complete list of these parameters is shown here and can be controlled directly through your DAW’s automation selection in the Minipol track.
| Master Volume | Sub Gain | Filter LFO Speed |
| Osc A Gain | SubOscASelector | Amp LFO Gain |
| Osc A Tune | Wow | Amp LFO Speed |
| Osc A Pan | Amp Attack | FX Filter Freq |
| Osc B Gain | Amp Delay | FX Filter Q |
| Osc B Tune | Amp Sustain | FX Delay Mix |
| Osc B Pan | Amp Release | FX Delay Feedback |
| Osc C Gain | Filter Attack | FX Chorus Rate |
| Osc C Tune | Filter Delay | FX Chorus Feedback |
| Osc C Pan | Filter Sustain | FX Chorus Delay |
| Osc D Gain | Filter Release | FX Chorus Width |
| Osc D Tune | Filter Amount | FX Tone Low |
| Osc D Pan | Filter Freq | FX Tone Mid |
| Noise Gain | Filter Q | FX Tone High |
| Noise Filter | Filter LFO Gain | FX Space Dry |
| FX Space Wet |
We hope you find Minipol creative and helpful and wish you tons of fun with the synth! – The Karanyi Sounds team