Polyscape Analogue Owner’s Manual
July 19, 2024First of all, thank you for choosing our instrument!
CONTENTS
System requirements
Download / setup after purchase
Installing Polyscape Analogue (Mac / Windows)
Uninstalling Polyscape Analogue (Mac / Windows)
Brief overview of the controls
SYSTEM REQUIREMENTS
| macOS | Windows |
| Mac OS X 10.11 or higher is recommended 4 GB of RAM, 8 GB is recommended 2 GHz CPU with at least 4 cores 64-bit DAW/host 0.8 GB free disk space | Windows 8 or higher 4 GB of RAM, 8 GB is recommended 2 GHz CPU with at least 4 cores 64-bit DAW/host 0.8 GB free disk space |
SETUP AFTER PURCHASE
Downloading & Getting Your Serial Number
After you successfully purchase Polyscape Analogue, you will receive an email with your product’s download link and a unique serial number. To download your installer and get your activation number, please do the following:
- Log in to your Karanyi Sounds account and go to My Account’s Downloads page.
- On your Downloads page, search for Polyscape Analogue, and you will find your unique serial code. You will need this serial number to activate your product the first time you run it.
- Download your version of the plug-in (Mac or Windows)
Installation (Mac)
- Download the related files from your account: “Polyscape_Analogue_Mac_Installer.1.0.0.pkg.zip” and “Polyscape_Analogue_Resources_1_0_0.hr1″then extract the zip file.
- Run the installer, which will paste the plugin to the default folders as follows:
VST3: Library/Audio/Plug-ins/VST3/
Audio Unit: Library/Audio/Plug-Ins/Components/
AAX: /Library/Application Support/Avid/Audio/Plug-Ins - Open your host DAW and find Polyscape Analogue. When you first run it, it will ask for the resources (Polyscape_Analogue_Resources_1_0_0.hr1). Select its location and choose the folder, where you want to store the audio samples of Polyscape Analogue. After the successful installation, close and reopen the plugin. It will then ask for a serial number. Enter your serial number to access the instrument. The serial number can found in your karanyisounds.com account. If you have any trouble with your serial number, please contact our support!
Installation (Windows – Without Installer)
- Download the related files from your account: “Polyscape_Analogue_Win_VST.VST3” “Polyscape_Analogue.aaxplugin.zip” and “Polyscape_Analogue_Resources_1_0_0.hr1”
- Place the VST3 and AAX formats into the relevant directories:
VST3: C:\Program Files\Common Files\VST3\
AAX: C:\Program Files\Common Files\Avid\Audio\Plug-Ins - Open your host DAW and find Polyscape Analogue. When you first run it, it will ask for the resources (Polyscape_Analogue_Resources_1_0_0.hr1). Select its location and choose the folder, where you want to store the audio samples of Polyscape Analogue. After the successful installation, close and reopen the plugin. It will then ask for a serial number. Enter your serial number to access the instrument. The serial number can found in your karanyisounds.com account. If you have any trouble with your serial number, please contact our support!
Installation (Windows – With Installer)
- Download the related files from your account: “Polyscape_Analogue_Win_Installer.exe” and “Polyscape_Analogue_Resources_1_0_0.hr1”
- Run the installer, which will paste the plugin to the default folders as follows:
VST3: C:\Program Files\Common Files\VST3\
AAX: C:\Program Files\Common Files\Avid\Audio\Plug-Ins - Open your host DAW and find Polyscape Analogue. When you first run it, it will ask for the resources (Polyscape_Analogue_Resources_1_0_0.hr1). Select its location and choose the folder, where you want to store the audio samples of Polyscape Analogue. After the successful installation, close and reopen the plugin. It will then ask for a serial number. Enter your serial number to access the instrument. The serial number can found in your karanyisounds.com account. If you have any trouble with your serial number, please contact our support!
Uninstall (Mac)
- Ensure both Polyscape Analogue and your DAW are closed.
- Find and delete the following folders and files on your system:
VST3: Library/Audio/Plug-ins/VST3/Polyscape Analogue.vst3
Audio Unit: Library/Audio/Plug-Ins/Components/Polyscape Analogue.component
AAX: /Library/Application Support/Avid/Audio/Plug-Ins/Polyscape Analogue.aax
Other files: /Users/(YOUR USER NAME)/Library/Application Support/Karanyi Sounds/Polyscape Analogue
IMPORTANT: AppData and Application Support folders are hidden by default,
you need to make sure you see hidden folders.
Uninstall (Windows)
- Ensure both Polyscape Analogue and your DAW are closed.
- Find and delete the following folders and files on your system:
VST3: C:\Program Files\Common Files\VST3\Polyscape Analogue.vst3
AAX: C:\Program Files\Common Files\Avid\Audio\Plug-Ins\Polyscape Analogue.aax
Other files: C:\Users(YOUR USER NAME)\AppData\Roaming\Karanyi Sounds\Polyscape Analogue
IMPORTANT: AppData and Application Support folders are hidden by default,
you need to make sure you see hidden folders.
BRIEF OVERVIEW
“Blend View”
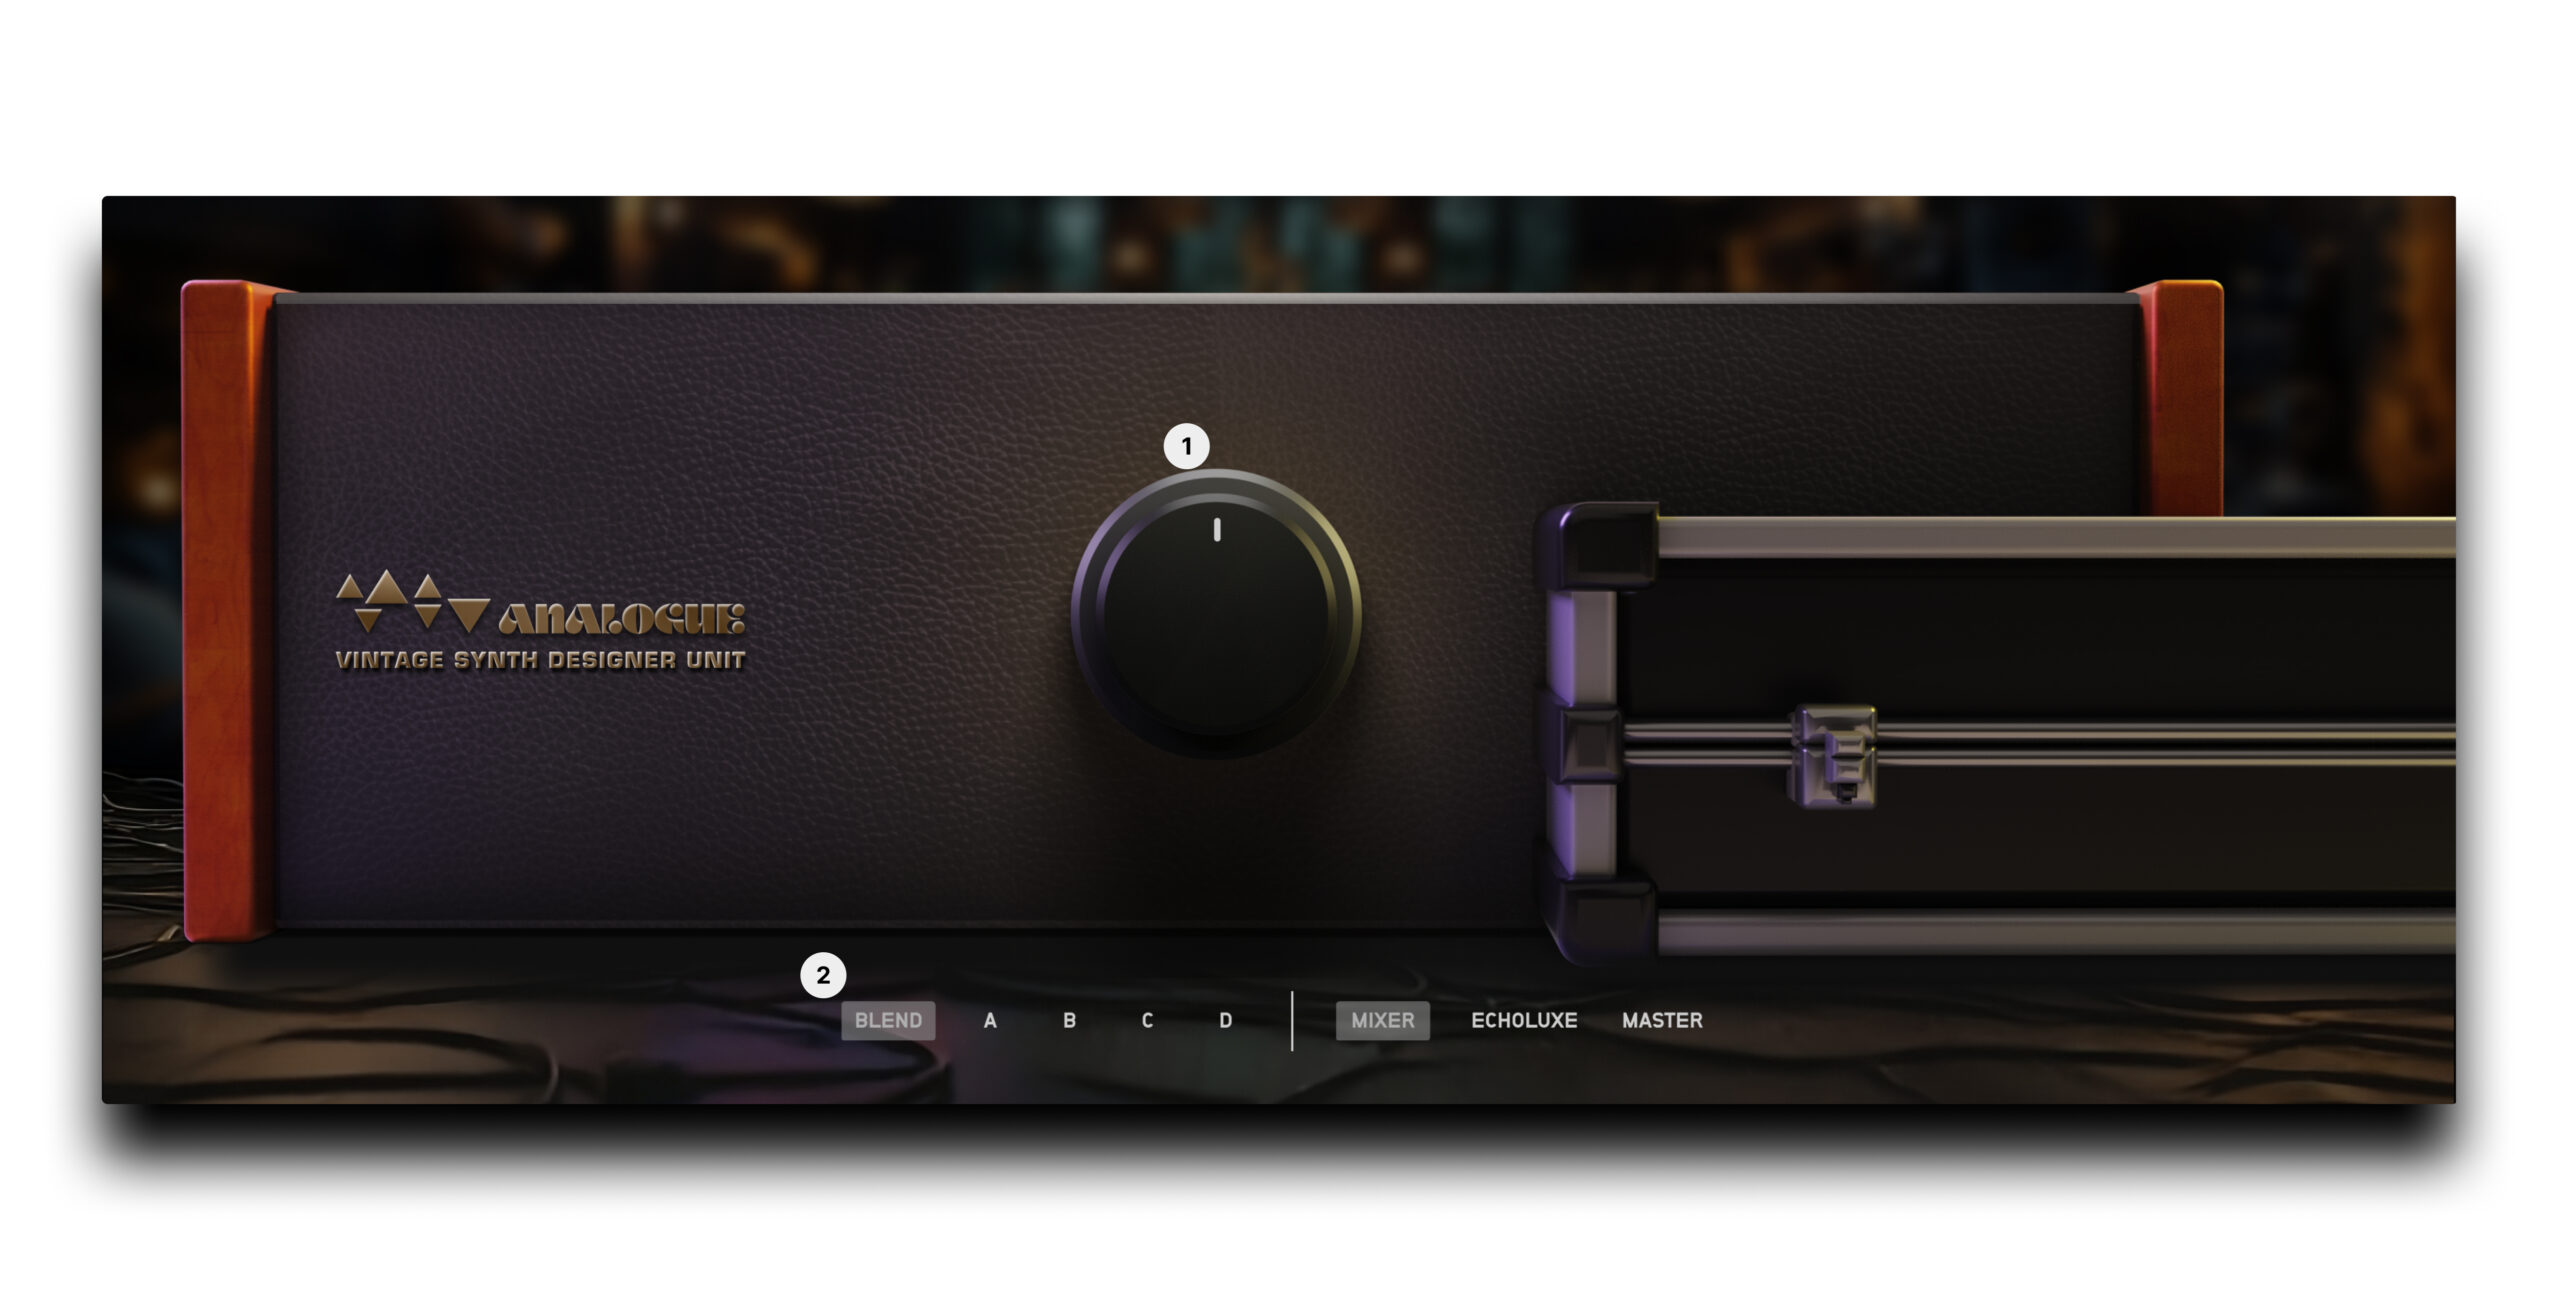
- Click on the big knob and move it to blend between A&B vs. C&D layers, enabling you to create an epic movement in your sound.
- Here you can select your view. On the left side, you can choose what to see on the top side of the interface. You can choose between blend and the 4 sound layers (A-D) On the right side, you can browse between 3 views: First is the Mixer, where you can control basic parameters of each layer on the same page (volume, device fx dry/wet, sub osc. settings). The second is the Echoluxe, where you can dive deep into all the parameters of this FX. And finally, the master view, where you can apply master effects and get inspiration by using the Smart Random Controls.
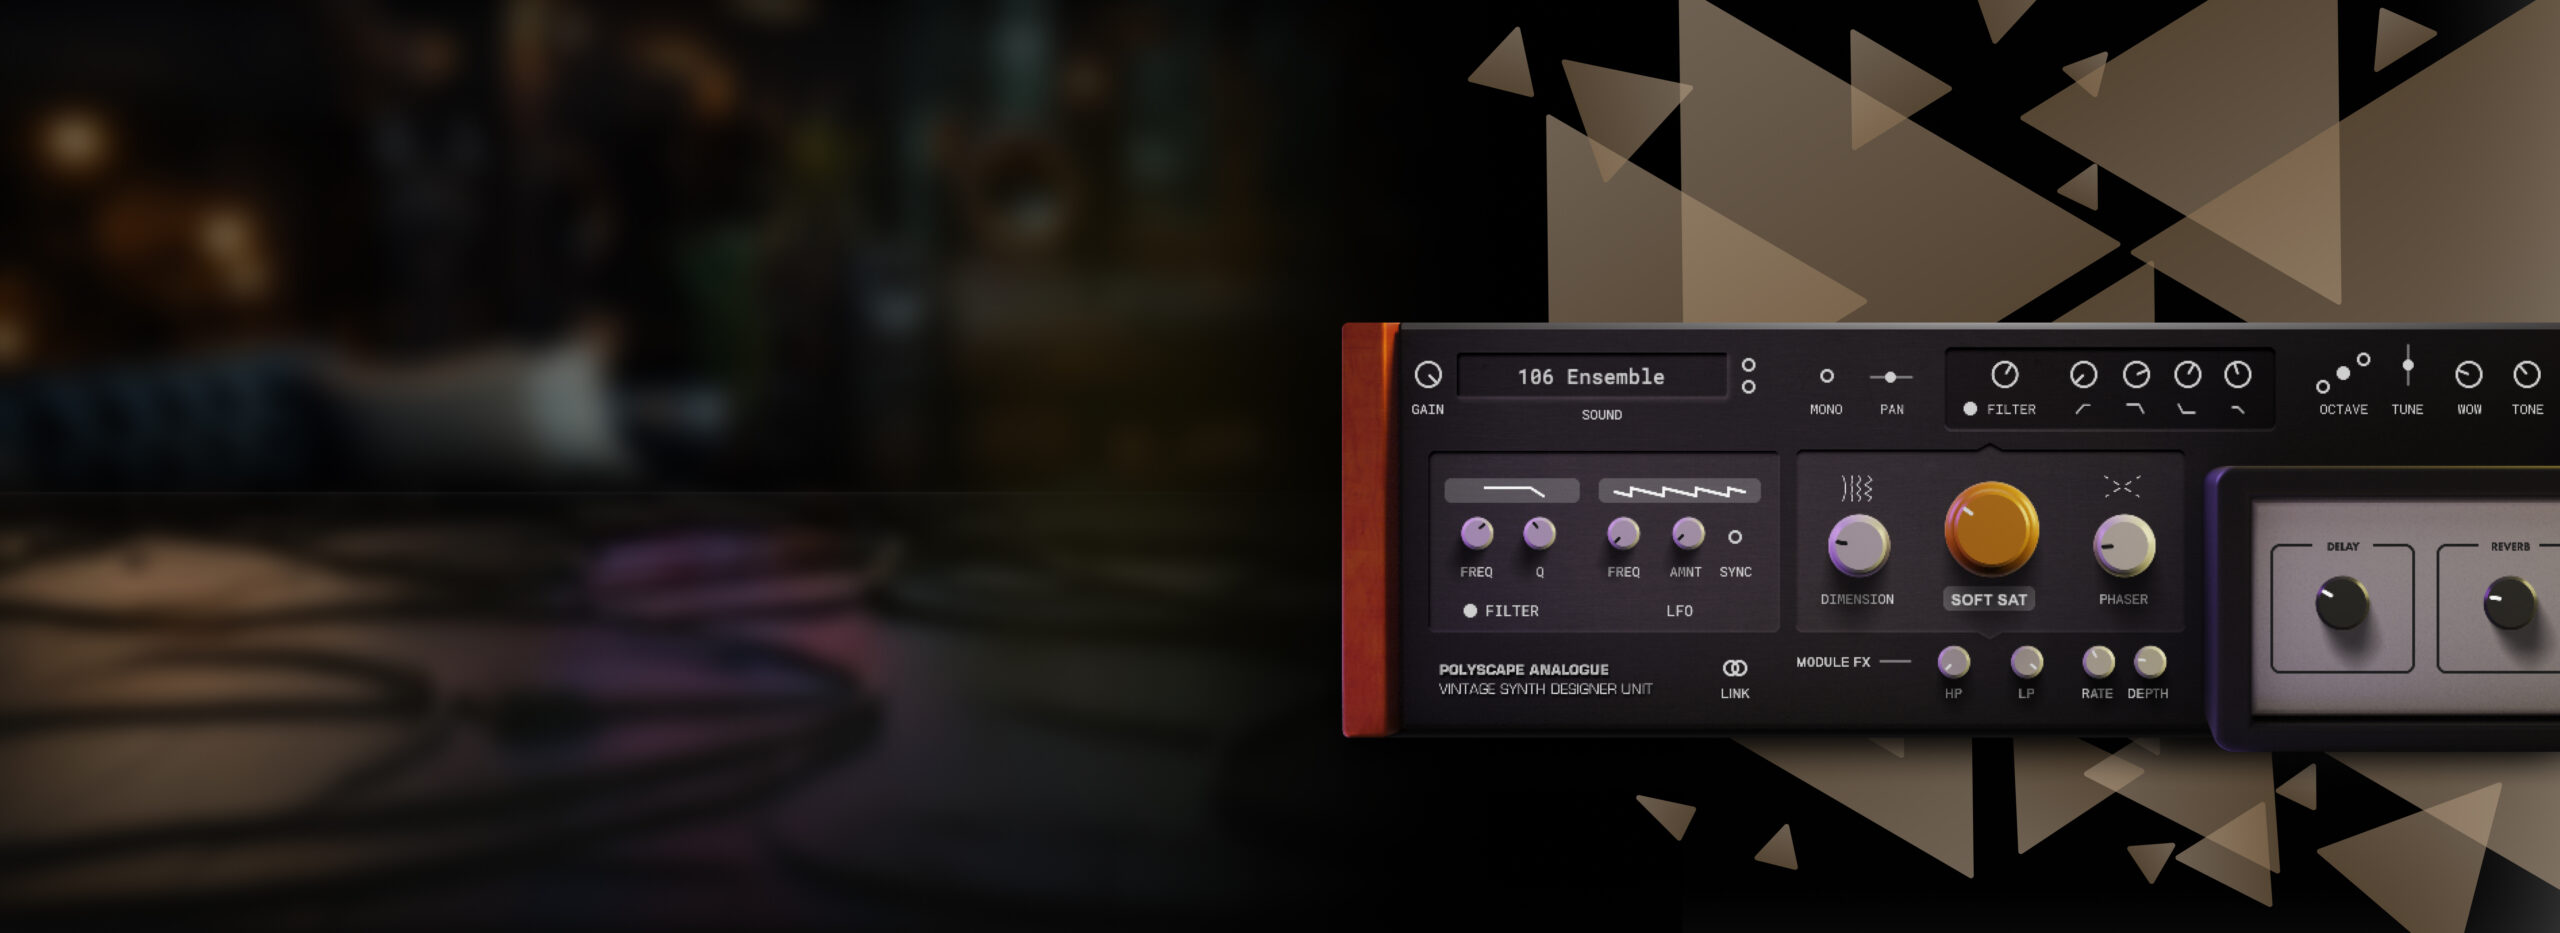
“Device View”
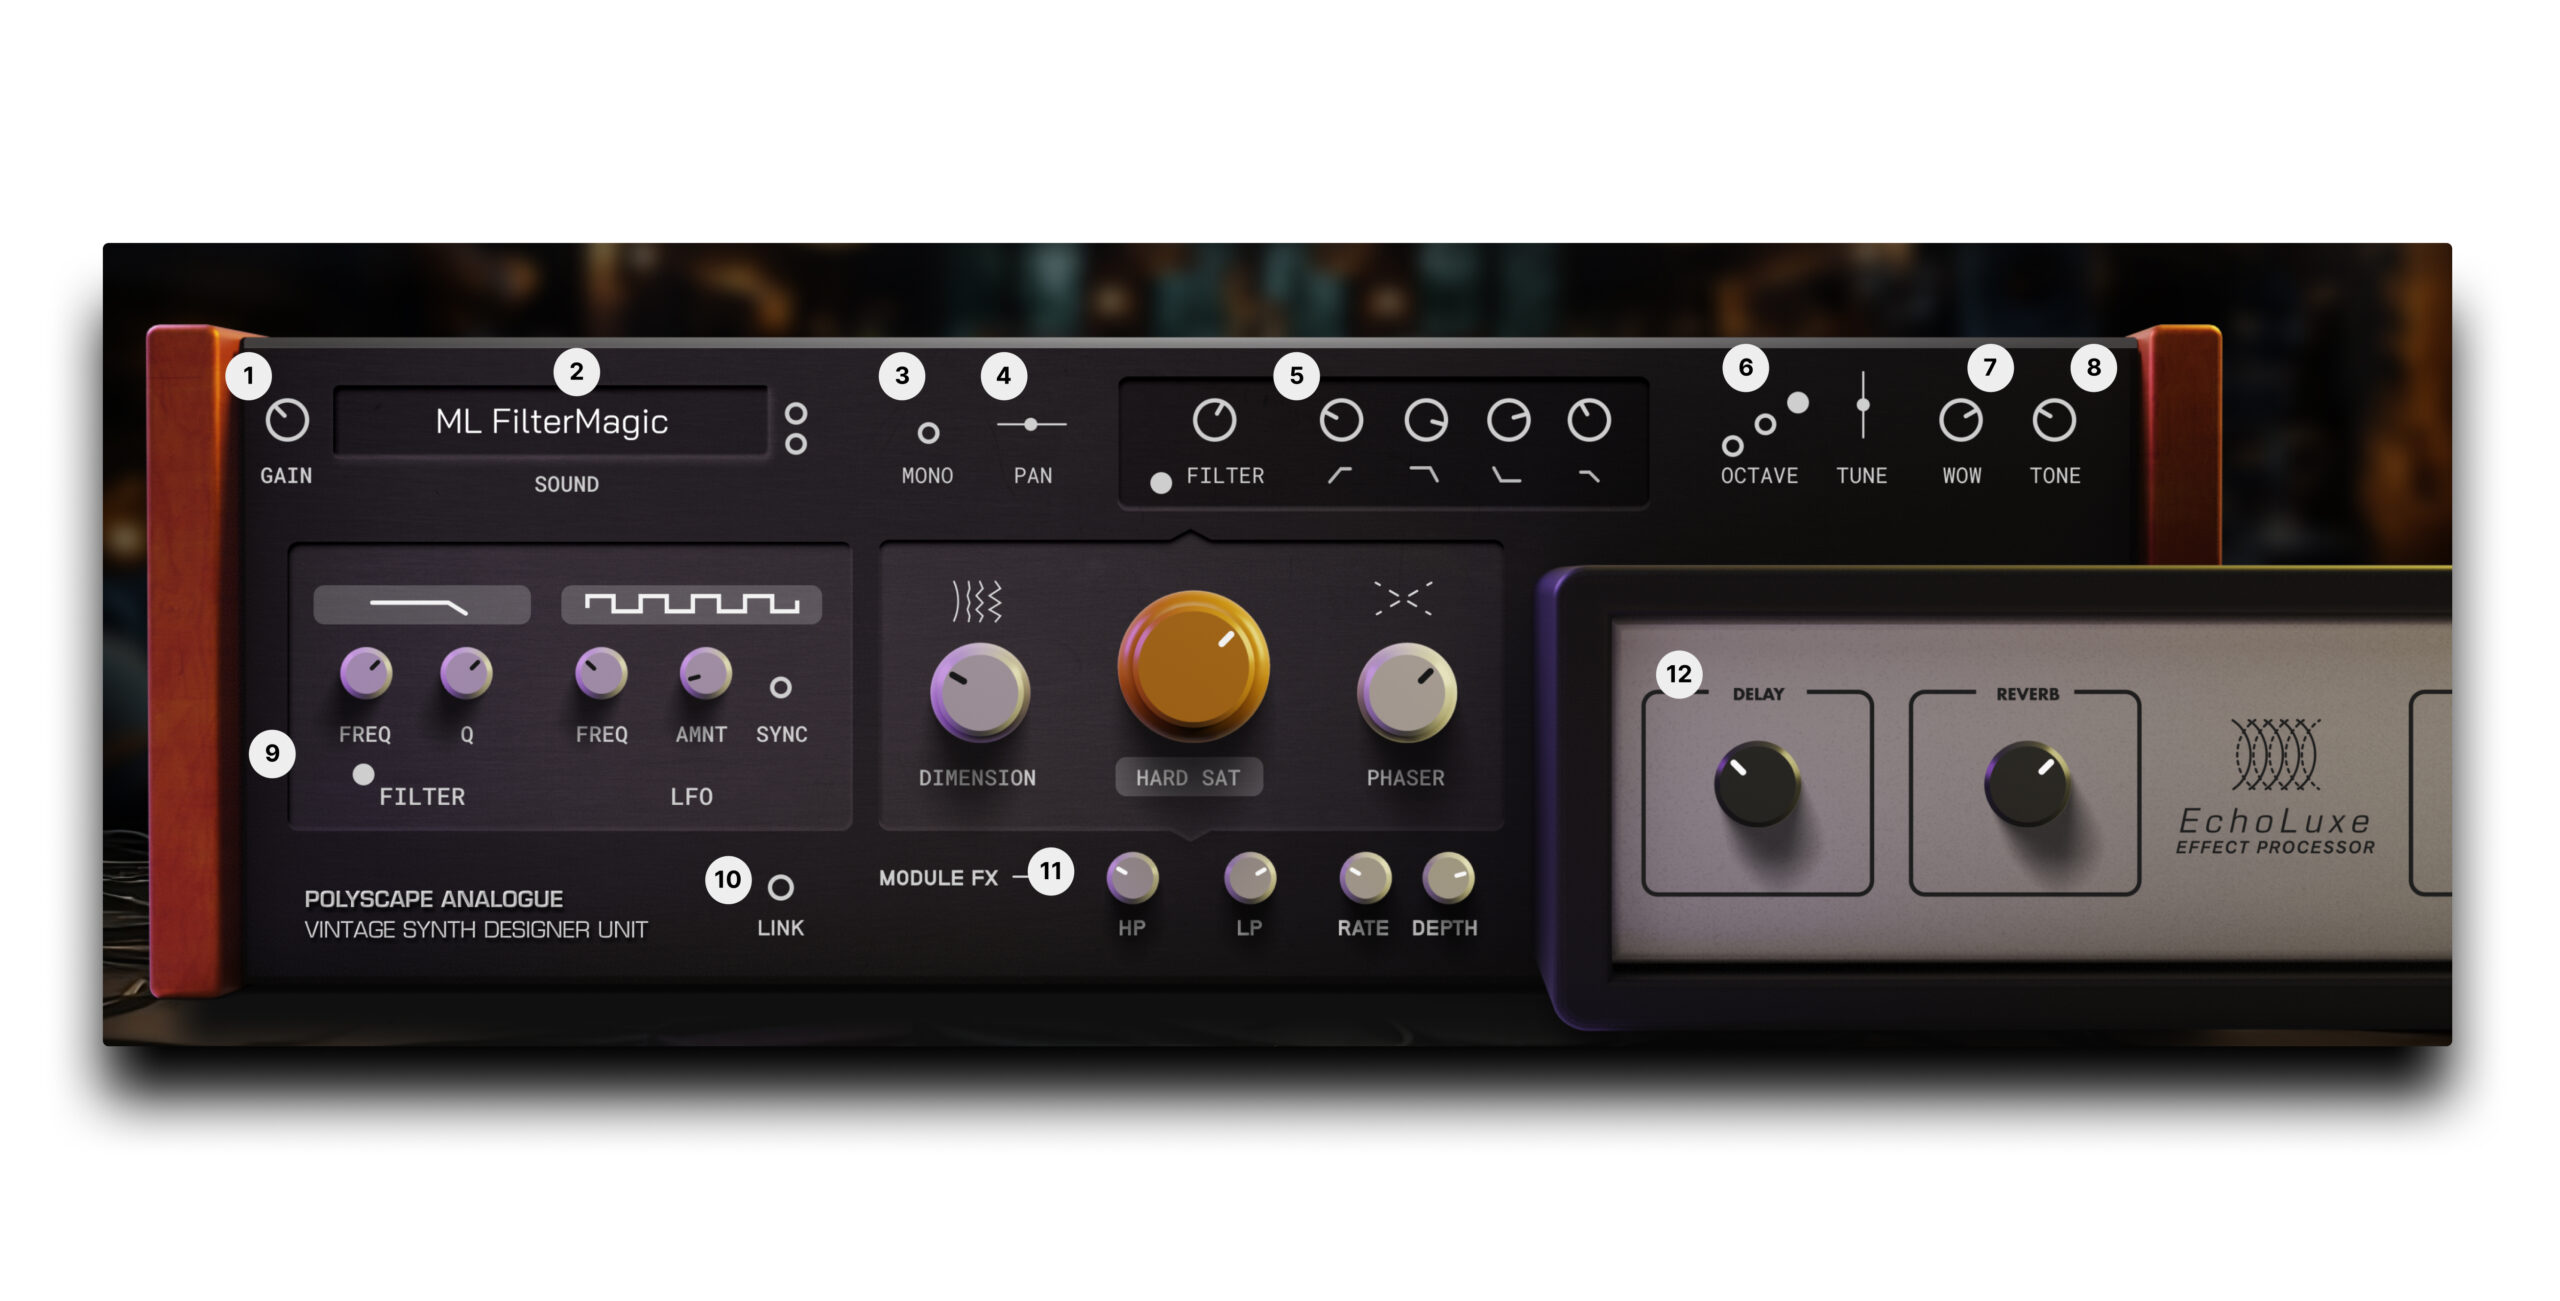
- Each of the four layers comes with individual controls for volume.
- Sound Source Selection: Choose from 25 distinct sound sources to form the foundation of your sound.
- You can switch between poly and mono modes here.
- Each of the four layers comes with individual controls for panning.
- ADSR Envelope: Shape the dynamics of your sound with Attack, Decay, Sustain, and Release controls for both the amplitude and filter envelope, offering nuanced expression. Click on the filter button to see the filter ADSR instead of the amp. ADSR.
- You can set here the octave and finetune.
- Wow Control: Introduce subtle to extreme modulation effects, mimicking the characteristics of analog tape.
- Tone: Emphasize the low or the high end of the channel with ease, ensuring a perfect fit in your mix.
- Filter Section: Sculpt your sound with high-pass, low-pass, band pass and notch filters, adjustable resonance and cutoff frequency, to refine or dramatically transform each layer. With the help of the built-in LFO (Low Frequency Oscillator), you can apply modulation to filter with customizable shape, depth (amnt) and frequency, introducing movement and vibrancy – that you can also sync to the host tempo.
- Link: If this is active, the adjustments made on the parameters of this device will affect the other 3 devices (layers) too.
FX section:
11. Module FX: add depth and stereo wideness to each of your layers with Dimension, add gentle saturation or wild overdrive with the advanced Drive FX – with a resonant high pass/low pass control to deepen the sound design options, or add a nice phaser effect with customizable rate and depth.
12. Echoluxe: The settings of these apply to all layers in contrary to the Module FX section, but you can adjust the dry/wet balance for each module separately here. See more at the “device fx section”
“Mixer View”
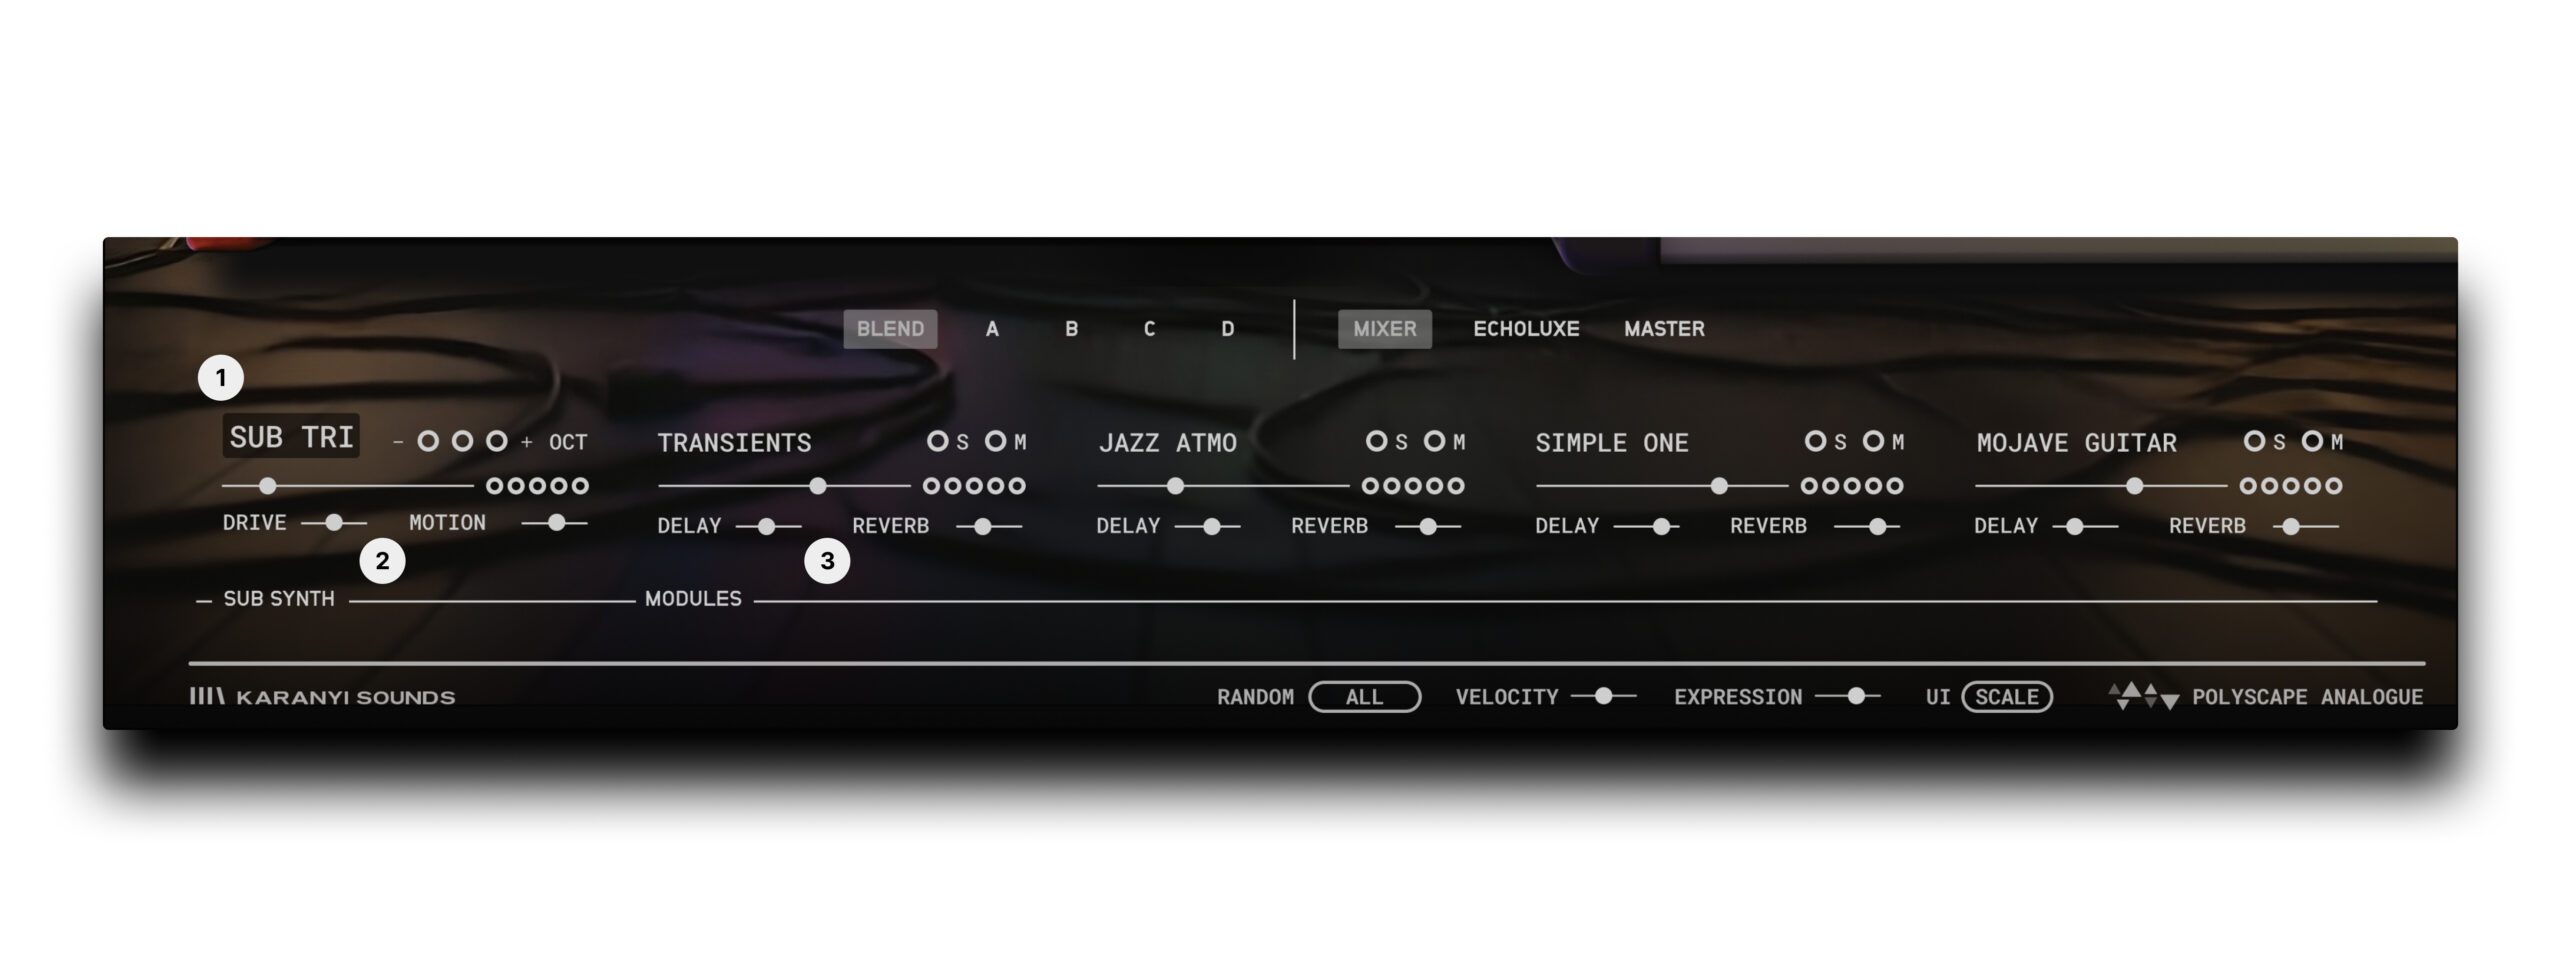
- Here you can choose between 2 waveforms of the sub oscillator (triangle and rectangle) and shifts its octave.
- Refine the sub layer by adding drive and motion to this virtual analogue oscillator.
- You can control the gain and device fx dry/wet of each of the 4 layers. You can also solo or mute any of them from here.
“Echoluxe View”
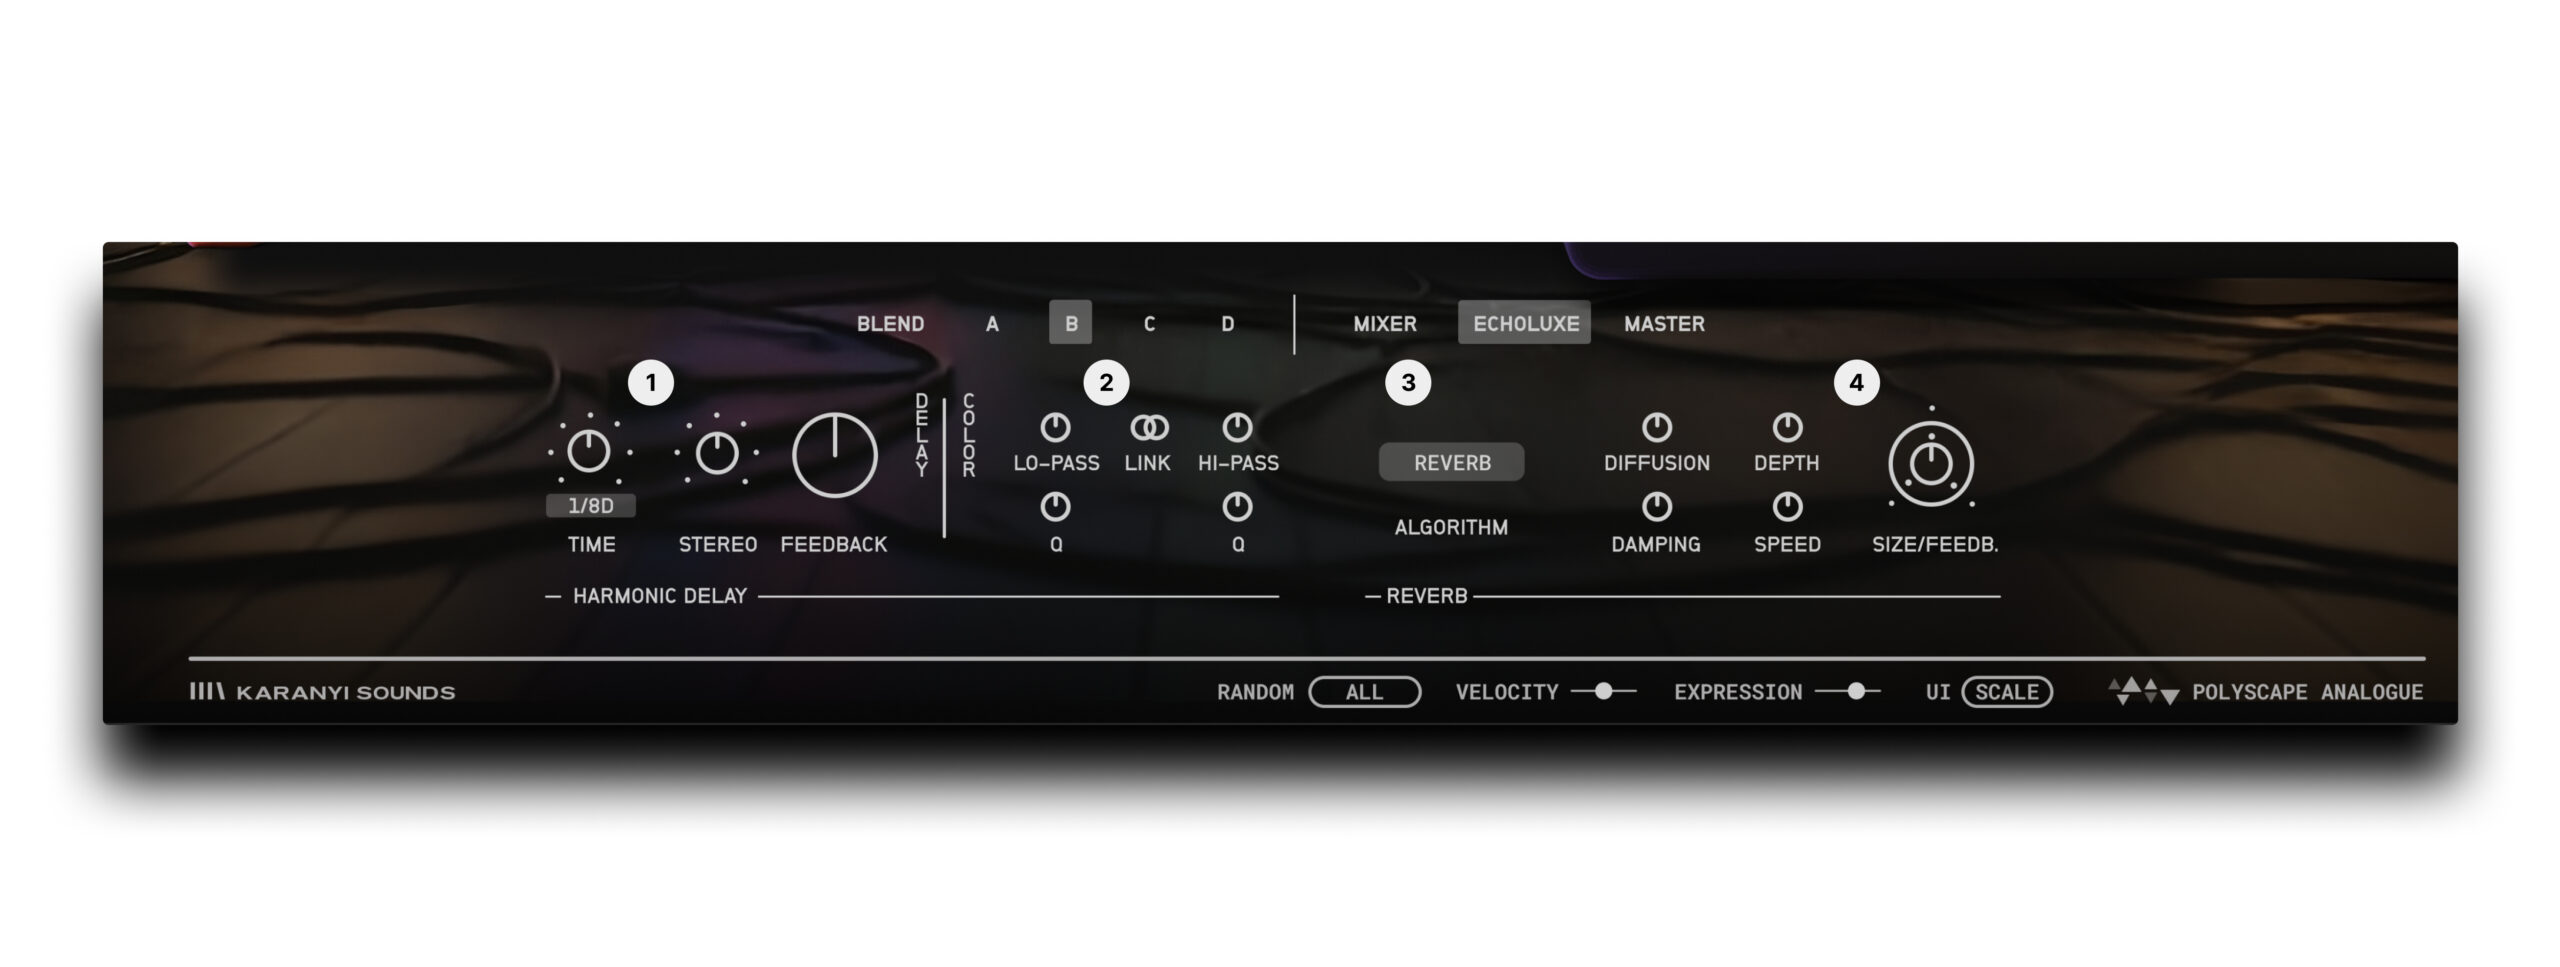
- Basic delay parameters are controlled here: Time, stereo wideness and feedback.
- Advanced delay parameters are fine-tuned here: Low and high pass filter cutoff and resonance. You can also generate endless resonant feedback with these. You might link the low and high-pass filter cutoffs, so their distance is constant.
- Adjust the character of the reverb here. You can choose between two distinct algorithms.
- Finetune your reverb sound with diffusion and damping, add modulation with depth and speed controls and fine-tune the reverb size and feedback from here.
“Master View”
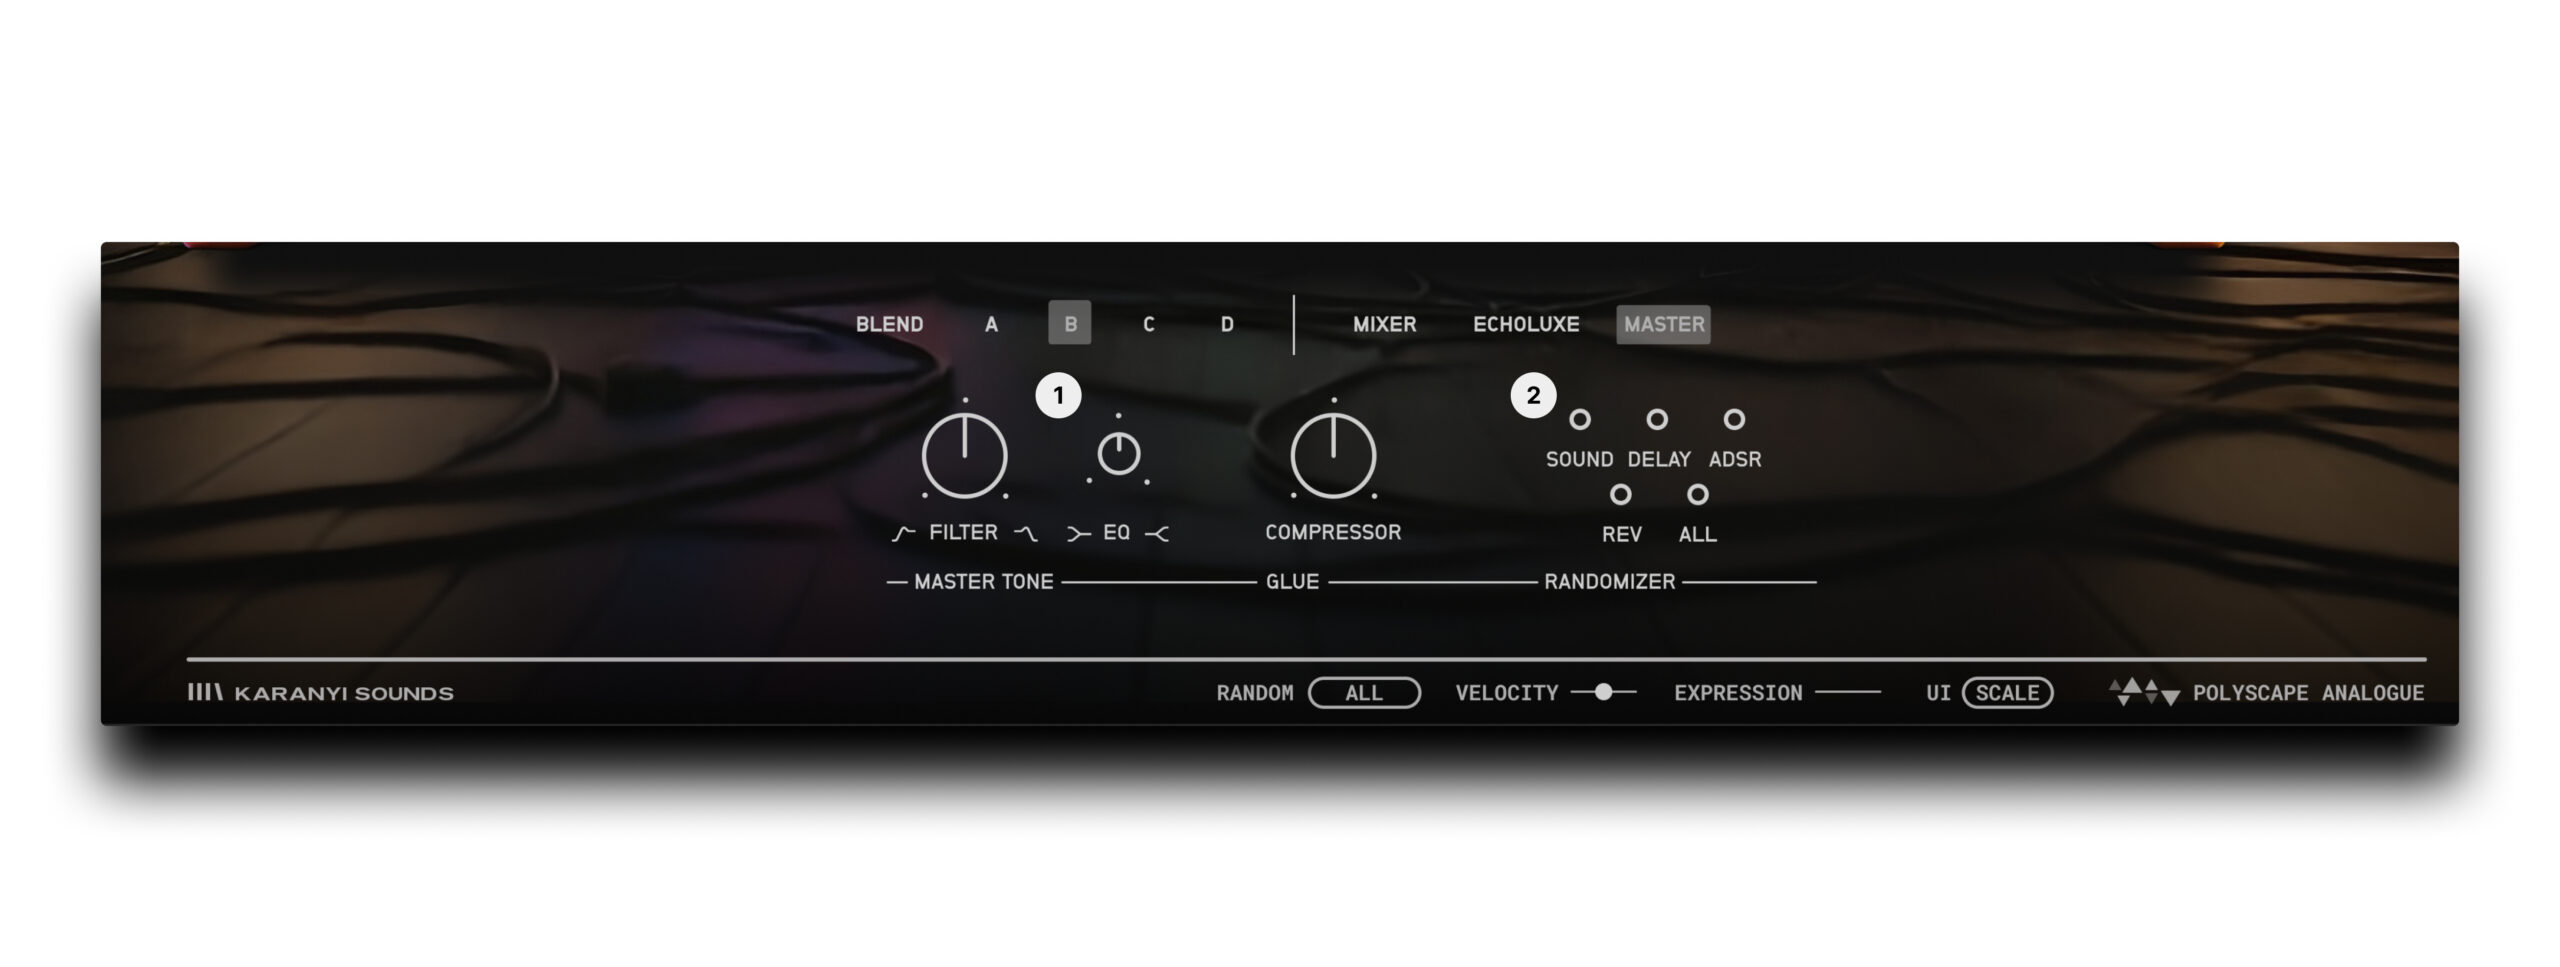
- Master FX: The final stage of your signal path includes a high-pass/low-pass filter for removing unwanted frequencies, a tone EQ for overall shaping and a glue compressor for cohesion, ensuring a polished output.
- Smart Random Controls: Instantly generate new sound variations by randomizing sound sources, ADSR parameters, and effect settings, or all of the above at once – providing a source of endless inspiration.
Big thanks from all of us for adding Polyscape Analogue to your collection. We’re excited for the unique sounds and musical journeys it’ll bring you! – Your friends at Karanyi Sounds