Matra User Manual
January 5, 2020First of all, thank you for choosing our effect! Named after the echo-rich Matra Mountains in North Hungary, Matra lets you create captivating audio experiences through the art of delay! Explore the possibilities, from crafting ethereal vocal textures to infusing nostalgia with tape delay effects, all while achieving precise tonal control and instant inspiration.
CONTENTS
System requirements
Download / Setup
Installing Matra (Mac / Windows)
Installing Matra Plus (Mac / Windows)
Installing the DLCs
Uninstalling Matra (Mac / Windows)
Uninstalling Matra Plus (Mac / Windows)
Brief overview of the controls
SYSTEM REQUIREMENTS
| macOS | Windows |
| Mac OS X 10.11 or higher is recommended 4 GB of RAM, 8 GB is recommended 2 GHz CPU with at least 4 cores 64-bit DAW/host 450 MB free disk space | Windows 8 or higher 4 GB of RAM, 8 GB is recommended 2 GHz CPU with at least 4 cores 64-bit DAW/host 300 MB free disk space |
SETUP
Downloading & Getting Your Serial Number
After you successfully purchase Matra, you will receive an email with your product’s download link and a unique serial number. To download your installer and get your activation number, please do the following:
- Log in to your Karanyi Sounds account and go to My Account’s Downloads page.
- On your Downloads page, search for Matra, and you will find your unique serial code. You will need this serial number to activate your product the first time you run it.
- Download your version of the plug-in (Mac or Windows)
Installation – Matra (Mac)
- Download “Matra_Installer.1.0.0.pkg.zip” and extract it.
- Run the installer, which will paste the plugin to the default folders as follows:
VST3: Library/Audio/Plug-ins/VST3/
Audio Unit: Library/Audio/Plug-Ins/Components/
AAX: /Library/Application Support/Avid/Audio/Plug-Ins - Open your host DAW and find Matra. When you first run Matra, it will ask for a serial number. Enter your serial number to access the instrument. The serial number can found in your karanyisounds.com account. If you have any trouble with your serial number, please contact our support!
Installation – Matra (Windows)
- Download “Matra_Windows.rar” and extract the files within it.
- The plugin should be placed into your folder of plugins, based on the type (VST3, AAX). These are the default plugin libraries:
VST3: C:\Program Files\Common Files\VST3\
AAX: C:\Program Files\Common Files\Avid\Audio\Plug-Ins - Open your host DAW and find Matra. When you first run Matra, it will ask for a serial number. Enter your serial number to access the instrument. The serial number can found in your karanyisounds.com account. If you have any trouble with your serial number, please contact our support!
Installation – Matra Plus (Mac)
- Download “Matra_Plus_Installer.1.0.0.pkg.zip” and extract it.
- Run the installer, which will paste the plugin to the default folders as follows:
VST3: Library/Audio/Plug-ins/VST3/
Audio Unit: Library/Audio/Plug-Ins/Components/
AAX: /Library/Application Support/Avid/Audio/Plug-Ins - Open your host DAW and find Matra Plus. When you first run Matra Plus, it will ask for a serial number. Enter your serial number to access the instrument. The serial number can found in your karanyisounds.com account. If you have any trouble with your serial number, please contact our support!
Installation – Matra Plus (Windows)
- Download “Matra_Plus_Win.zip” and extract the files within it.
- The plugin should be placed into your folder of plugins, based on the type (VST3, AAX). These are the default plugin libraries:
VST3: C:\Program Files\Common Files\VST3\
AAX: C:\Program Files\Common Files\Avid\Audio\Plug-Ins - Open your host DAW and find Matra Plus. When you first run Matra Plus, it will ask for a serial number. Enter your serial number to access the instrument. The serial number can found in your karanyisounds.com account. If you have any trouble with your serial number, please contact our support!
NOTE: With Matra Plus, you also get additional DLC packs which need to be installed manually. See next section for details.
Installing the DLCs
If you purchased any DLC (preset pack) for Matra separately, or received it when buying Matra Plus, you need to place that pack manually to the preset folder.
MAC: /Users/(YOUR USER NAME)/Library/Application Support/Karanyi Sounds/Matra/User Presets
Win: C:\Users(YOUR USER NAME)\AppData\Roaming\Karanyi Sounds\Matra\User Presets
IMPORTANT: It might happen that when opening the plugin the first time, you cannot see the presets. It is caused by AppData or Application Support folders being read-only on your computer.
The full path of the presets are:
MAC: /Users/(YOUR USER NAME)/Library/Application Support/Karanyi Sounds/Matra/User Presets
WIN: C:\Users(YOUR USER NAME)\AppData\Roaming\Karanyi Sounds\Matra\User Presets
You need to make sure that these folders can be overwritten (disable read-only setting)
These folders are hidden by default, you need to make sure you see hidden folders.
Mac Uninstall (Manual)
- Ensure Matra and your DAW are both closed.
- Find and delete the following folders and files on your system:
VST3: Library/Audio/Plug-ins/VST3/Matra.vst3
VST3: Library/Audio/Plug-ins/VST3/Matra Plus.vst3 (in case of Matra Plus)
Audio Unit: Library/Audio/Plug-Ins/Components/Matra.component
Audio Unit: Library/Audio/Plug-Ins/Components/Matra Plus.component (in case of Matra Plus)
AAX: /Library/Application Support/Avid/Audio/Plug-Ins/Matra.aax
AAX: /Library/Application Support/Avid/Audio/Plug-Ins/Matra Plus.aax (in case of Matra Plus)
Other files: /Users/(YOUR USER NAME)/Library/Application Support/Karanyi Sounds/Matra
Other files: /Users/(YOUR USER NAME)/Library/Application Support/Karanyi Sounds/Matra Plus (in case of Matra Plus)
IMPORTANT: AppData and Application Support folders are hidden by default,
you need to make sure you see hidden folders.
Windows Uninstall (Manual)
- Ensure Matra and your DAW are both closed.
- Find and delete the following folders and files on your system:
VST3: C:\Program Files\Common Files\VST3\matra.vst3
VST3: C:\Program Files\Common Files\VST3\matra plus.vst3 (in case of Matra Plus)
AAX: C:\Program Files\Common Files\Avid\Audio\Plug-Ins\matra.aax
AAX: C:\Program Files\Common Files\Avid\Audio\Plug-Ins\matra plus.aax (in case of Matra Plus)
Other files: C:\Users(YOUR USER NAME)\AppData\Roaming\Karanyi Sounds\Matra
Other files: C:\Users(YOUR USER NAME)\AppData\Roaming\Karanyi Sounds\Matra Plus (in case of Matra Plus)
IMPORTANT: AppData and Application Support folders are hidden by default,
you need to make sure you see hidden folders.
BRIEF OVERVIEW
“Front View” part 1.
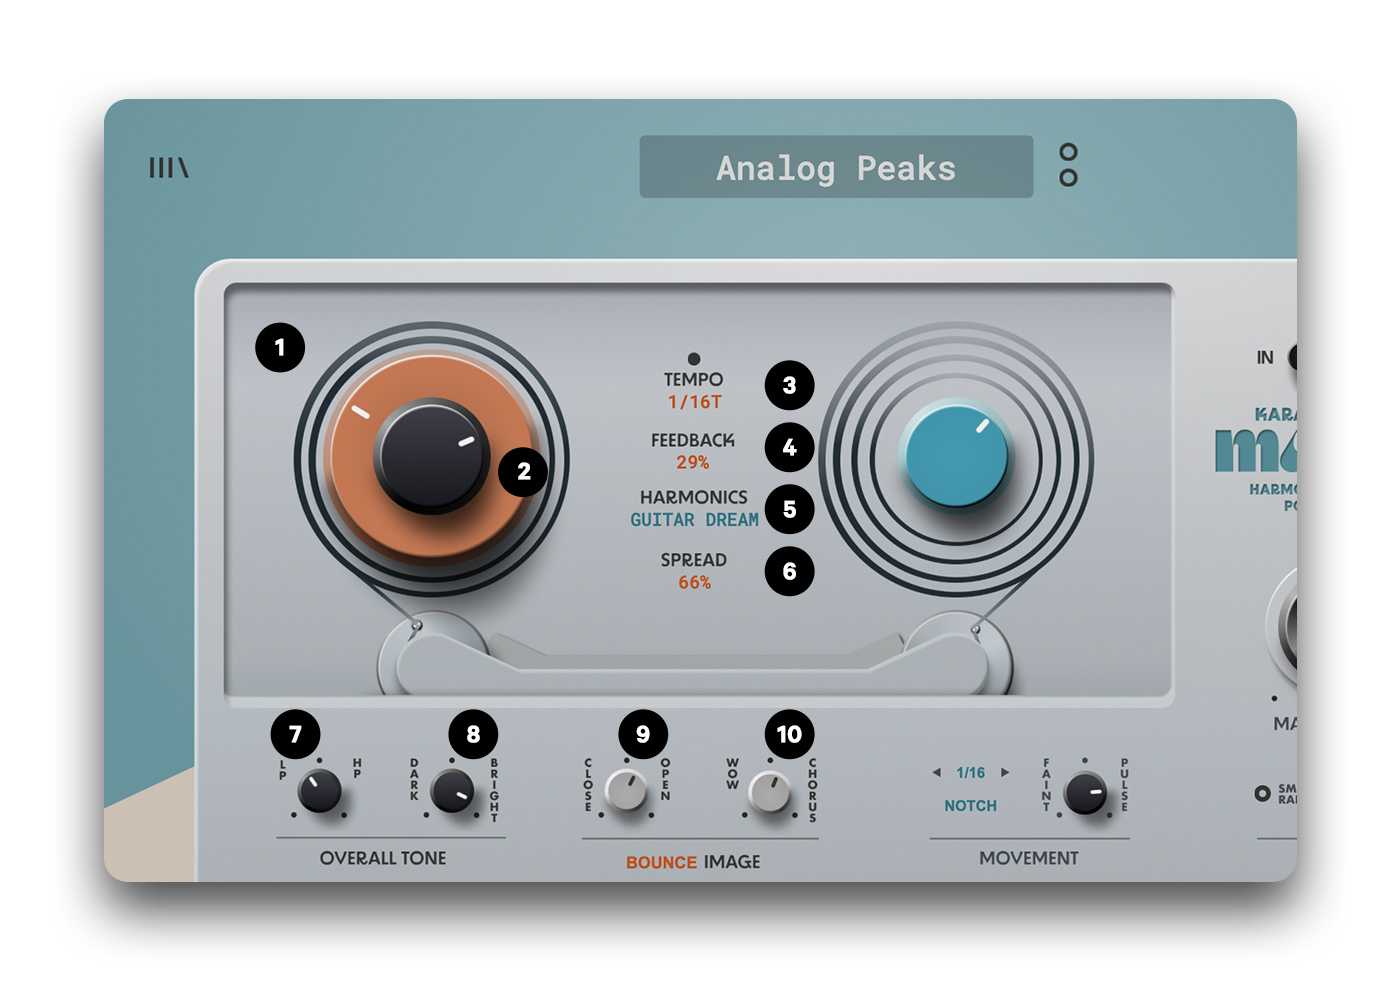
1. Delay engine #1 with tempo and feedback controls
2. The outer knob controls the feedback, while the inner knob controls the tempo
3. The visual representation of the tempo. This grey button is where you can swith between DAW sync/ms modes.
4. The visual representation of the feedback
5. “Harmonics” refers to presets of the dual filter (high and low cut) presets. You can further edit these settings with the “Tweak” view.
6. The visual representation of the Delay engine #2 dry/wet setting
7. Input filter with Low- and Highpass modes. NOTE: this effect impacts the dry signal as well.
8. Tonal EQ to make the overall sound brighter or darker. NOTE: this effect impacts the dry signal as well.
9. Controls the stereo stereo image of the sound. It can be set from mono to exterme, out-of-phase wideness.
10. Adds tape-like instability to the delay line
“Front View” part 2.
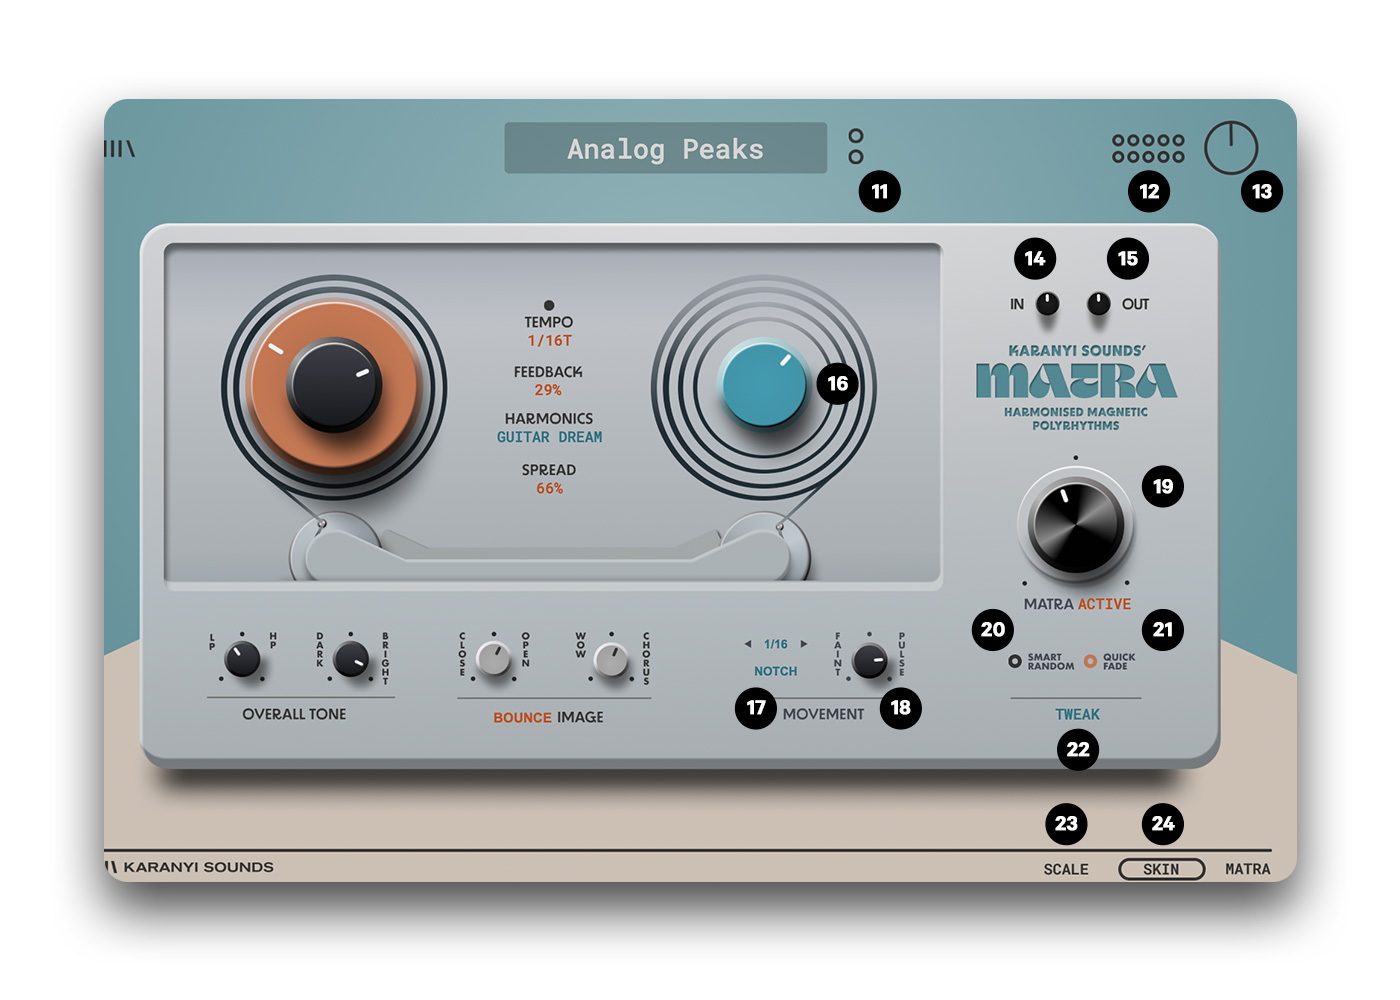
11. Preset selector – click on the small buttons to scroll up and down, click on the preset name to open the full preset manager.
12. The visual representation of the loudness
13. Main volume
14. Input gain
15. Output gain
16. Delay engine #2 named “Spread” dry/wet control. You can further edit its settings with the “Tweak” view.
17. Type (HP, BP, LP, Notch) and tempo of the filter LFO
18. Sets the amount of the filter LFO “faint” represents gentle movement, while “pulse” is more distinct and powerful.
19. Main dry/wet. Click on the “active” button to switch to bypass mode and click on the “bypass” button to switch back.
20. Randomizes the settings for instant inspiration
21. Similar to a “panic” function. Overrides the feedback setting, so the delay will fade out in a short time.
22. Switches to the “tweak” view that lets you access further controls.
23. Rescales the GUI to 125%
24. Switches to alternate skins
“Tweak View”
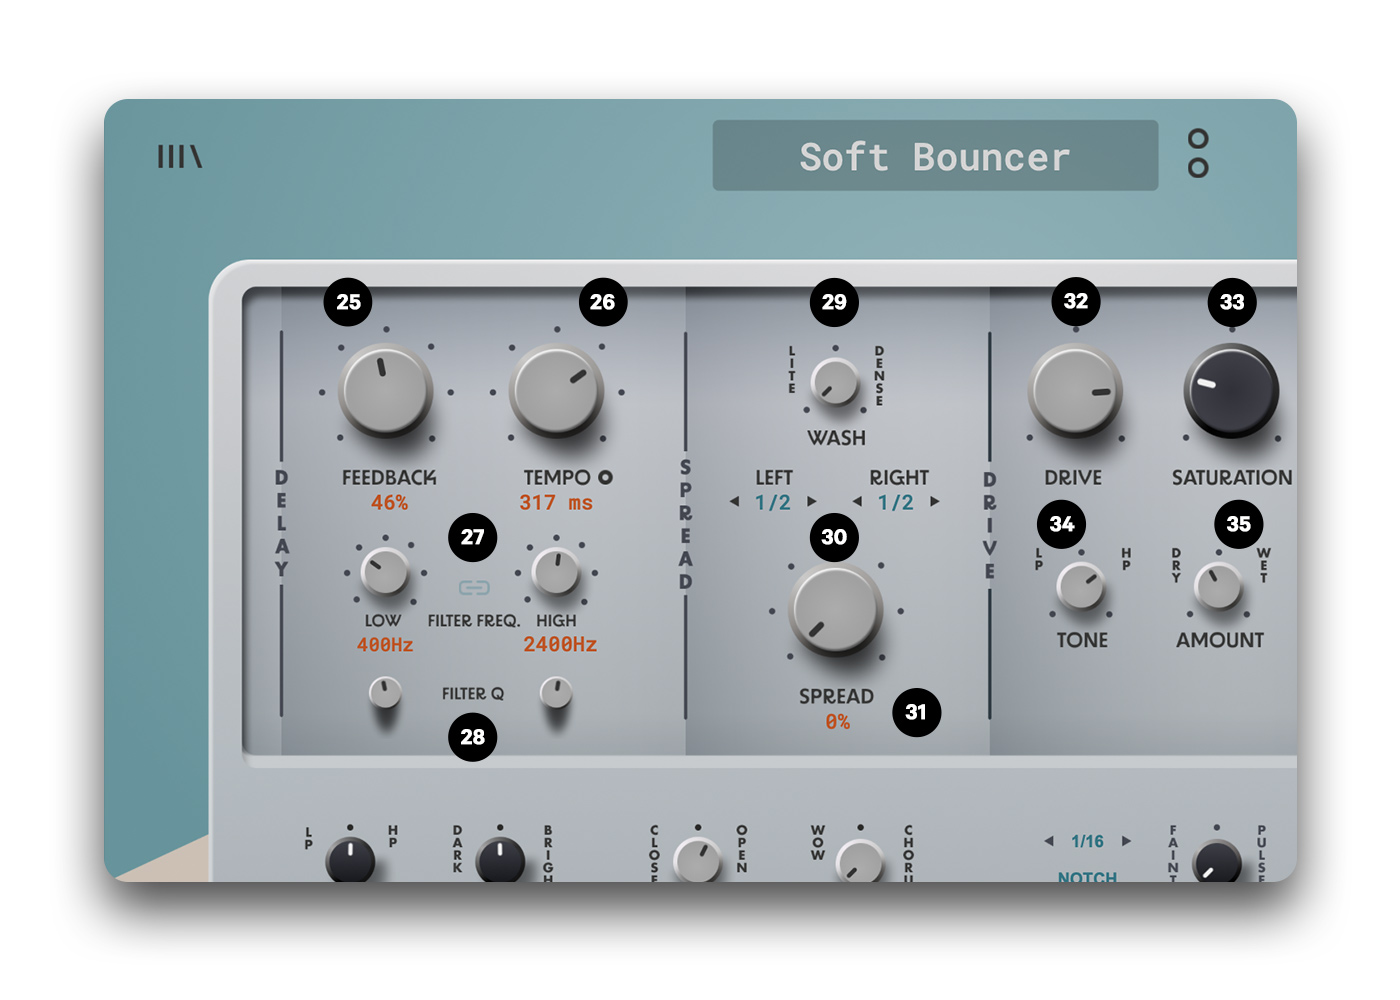
25. Sets the feedback of Delay Engine #1, the same way as on the Front.
26. Sets the tempo of Delay Engine #1, the same way as on the Front.
27. The dual filter engine: set the low and high cut frequencies separately, or link them with the “link” button. The harmonics presets on the front (#5) represent the settings of these parameters together with the resonance (#28)
28. Dual filter engine resonance. You can control the low cut and the high cut resonances separately.
29. “Wash” control: you can blur the signal coming through the delay chain with a touch of reverb and a hint of grain delay
30. These set the delay time of Delay Engine #2 – left and right channel independently
31. Controls the dry/wet ratio of Delay Engine #2, the same way as on the Front.
32. Drives the signal coming through the delay chain. NOTE: the effect is highly dependent on the input signal level. You can easily adjust it with the input gain (#14)
33. An overall saturation, that can also be used as a “glue”. NOTE: this effect impacts the dry signal as well.
34. Input filter before the signal hits the Drive. An easy way to control the frequency content impacted by the effect.
35. Sets the dry/wet ratio of Drive. With this you can achieve a parallel distortion effect.
SOME USE CASES / SOUND DESIGN TRICKS
1. Vocal Glitching: Apply the “Pulse” filter LFO setting (#18) with high resonance (#28) to create glitchy vocal effects.
2. Spacey Delays: Use the “Wash” control (#29) to add a touch of reverb and grain delay to create spacious, ambient delays for instrumentals.
3. Dual Filter Sweeps: Experiment with dual filter settings (#27) to create evolving soundscapes with separate low and high cut frequencies. Also try to automate the cut frequencies. An lfo can be a good way to achieve rhythmic textures.
4. Saturation Harmony: Apply saturation (#32) as a “glue” effect to add warmth and cohesion to your mix.
5. Parallel Distortion: Achieve parallel distortion effects by adjusting the dry/wet ratio of Drive (#35) to blend distorted and clean signals.
6. Tape-Style Drift: Add tape-like instability (#10) to Delay Engine #2 for vintage tape delay character.
7. Dynamic Feedback Swells: Automate feedback controls (#1 and #25) to create feedback swells that evolve over time.
8. Filtered Drive: Place the input filter before the signal hits the Drive (#34) to control the frequency content affected by distortion, perfect for dirty basslines.
A big thank you for making Matra an integral part of your instrument collection. May it lead you to a world of fresh and fantastic sounds! – The Karanyi Team